
Sweet, Salty & So Festive: Your New Favorite Holiday Pretzel Wreaths!
Hello, my friend! Come on in, grab an apron—the fun, flour-dusted kind, not the pristine one for company—and let’s get ready to make some magic. Is there anything better than the smell of the holidays? That cozy blend of cinnamon, pine, and… pretzels? You heard me right! Today, we’re whipping up the most adorable, downright delicious, and incredibly easy treat that will steal the show on any cookie tray: No-Bake Pretzel Wreaths!
If you’re looking at your calendar and feeling that familiar pang of holiday stress, this recipe is your new best friend. We’re talking zero oven time, minimal mess (I promise!), and maximum festive cheer. These sweet-and-salty wreaths combine crunchy mini pretzels with smooth green candy coating, a flurry of colorful sprinkles, and the cutest little Twizzler bows you ever did see. They’re perfect for gifting to neighbors, setting out for Santa, or just keeping all to yourself with a cup of hot cocoa. The best part? You don’t need to be a pastry chef to make something that looks absolutely professional. This is all about having fun in the kitchen and creating something that sparks joy. So, let’s turn up the holiday tunes, pour ourselves something merry, and create these little edible wreaths together!
A Wreath-Making Tradition is Born
This recipe always takes me right back to one particularly chaotic, flour-filled Christmas Eve. I was about ten years old, and my mom, in her infinite wisdom, decided we needed a last-minute, kid-friendly activity to keep my cousins and me from bouncing off the walls with anticipation. She cleared the kitchen table, dumped out a bag of pretzels, melted some chocolate, and told us to “create.”
We were architects of confectionery disaster. There were more sprinkles on the floor than on our creations, and my attempt at a bow looked more like a squished beetle. But you know what? We were utterly captivated. We felt like real chefs, and when we proudly presented our lopsided, overly-sprinkled wreaths to the family later that night, you would have thought we’d sculpted them from marzipan. That messy, joyful, collaborative spirit is what I want to bring to you with this recipe. It’s not about perfection; it’s about the memory you make while your fingers get a little sticky. It’s a tradition I’ve carried forward, and now I’m so excited to share it with you.
Gathering Your festive Supplies
This is the best kind of shopping list—short, sweet, and forgiving! Here’s everything you need to make about a dozen beautiful wreaths.
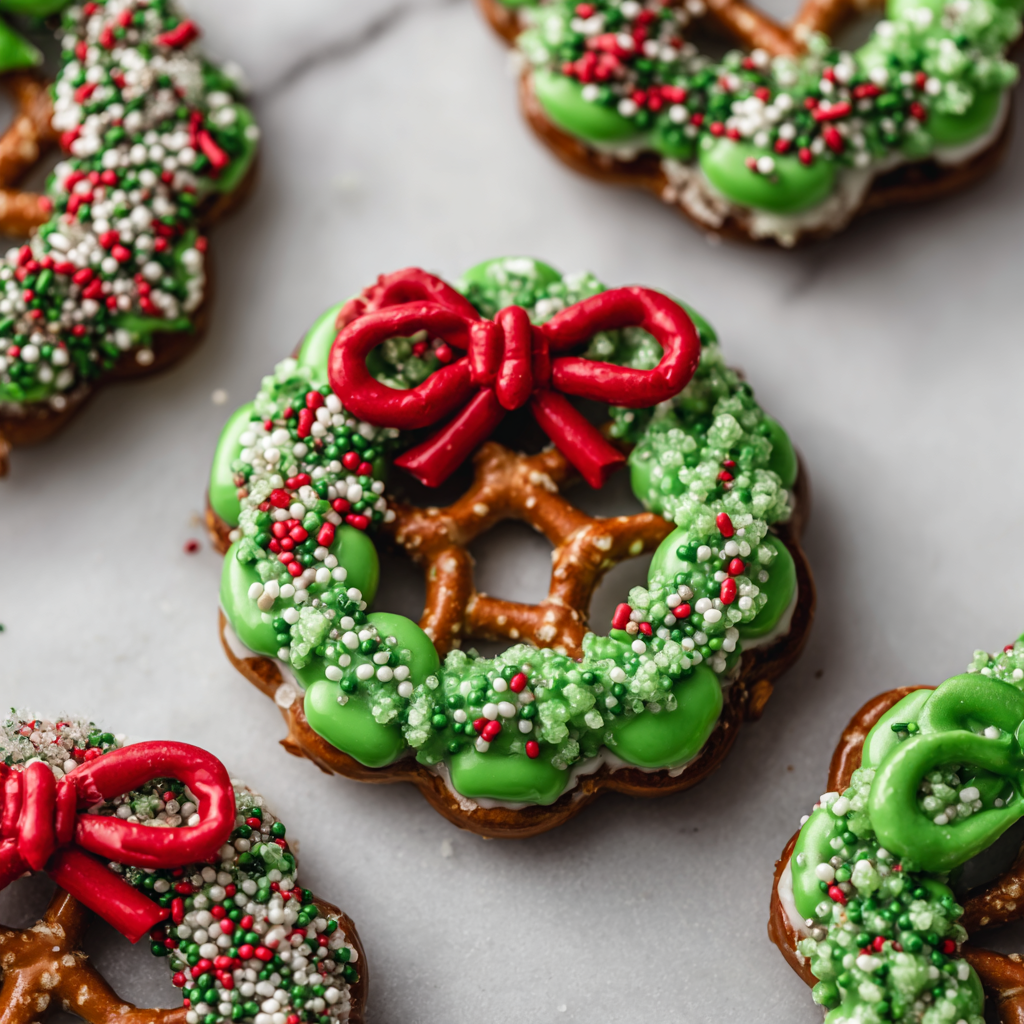
- Mini Pretzels (1 bag): The foundation of our wreath! Their classic twist shape is perfect for mimicking bundled evergreen branches. Chef’s Insight: Grab the “mini” ones, not the tiny “pretzel snaps.” You want a good base to build on! If you need a gluten-free option, there are fantastic GF mini pretzels available that work just as beautifully.
- Green Candy Melts (1 cup): This is what gives our wreaths that gorgeous, festive green color and holds everything together. Substitution Tip: No candy melts? No problem! You can use 1 cup of high-quality white chocolate chips or almond bark. Gently melt it and stir in a few drops of green gel food coloring (liquid food coloring can cause the chocolate to seize). Gel color gives a much richer, more vibrant hue!
- Twizzlers (Pull & Peel variety): This is our ribbon! The Pull & Peel kind is ideal because you can easily separate the strands and shape them into perfect, pliable bows. Red is the classic choice, but feel free to get creative with other festive colors!
- Holiday Sprinkles: The “cheer” in our holiday cheer! Use whatever mix makes you happy—little red and green nonpareils, tiny sugar stars, or a mix of festive shapes. This is where your personality shines through.
- Parchment Paper: Our trusty workhorse. This prevents the candy-coated pretzels from sticking to your baking sheet and makes cleanup an absolute dream. Wax paper can work in a pinch, but parchment is always my go-to for no-stick success.
Let’s Build Some Wreaths! Your Step-by-Step Guide
Ready to create? Follow these steps, and you’ll have a tray of gorgeous wreaths in no time. I’ve packed this section with all my favorite tips and hacks to make the process smooth and fun!
- Prep Your Station: Before you even think about melting, line a large baking sheet with parchment paper. This is your “wreath workshop.” Have all your ingredients measured and within arm’s reach. Trust me, when you’re working with melted candy, having everything ready to go is the key to a stress-free experience. Chef’s Hack: If your kitchen is warm, you can even pop the baking sheet in the fridge for a few minutes before starting. A cool surface helps the candy set faster!
- Melt the Candy Coating: Pour your green candy melts into a microwave-safe bowl. Heat them in the microwave in 20-second bursts, stirring vigorously between each burst. Stop when just a few small lumps remain—the residual heat will melt them as you stir. Chef’s Hack: NEVER over-microwave hoping to melt those last lumps; you’ll scorch the candy and end up with a thick, clumpy mess. Low and slow is the way to go! For ultra-smooth dipping, you can add a tiny teaspoon of coconut oil to the melts before microwaving.
- Dip and Arrange the First Layer: Now for the fun part! Take a mini pretzel and fully submerge it into the melted green candy. Use a fork or a dipping tool to lift it out, gently tapping off any excess coating. Place it on your parchment paper. Continue dipping and placing pretzels, arranging them in a circle. You’ll need about 6-7 pretzels to form the base of your wreath. Don’t worry about perfection here; a slightly rustic look is part of the charm!
- Build the Second Layer: This is the secret to a sturdy, professional-looking wreath! Once your first circle is down, immediately dip more pretzels and gently layer them on top of the first circle, slightly offsetting them to fill in any gaps. This double layer adds height and stability, making your wreath look lush and full, just like a real evergreen wreath.
- Decorate with Sprinkles: This step requires speed! While the candy coating is still wet, generously sprinkle your holiday sprinkles over the wreath. This is a fantastic job for little helpers—they love it! Chef’s Tip: To contain the sprinkle explosion, try holding your wreath over the bowl of sprinkles as you add them. The excess will fall back into the bowl for reuse.
- Create the Bow: Take your Pull & Peel Twizzler and separate two strands. Pinch each strand in the middle to form two simple loops, then press them together in the center to create a bow shape. You can use a tiny dot of leftover melted candy as “glue” to hold the center of the bow together. Before the candy on your wreath fully sets, gently press your beautiful Twizzler bow onto the bottom of the wreath.
- Let Them Set: Patience, grasshopper! Allow your wreaths to set completely at room temperature. This usually takes about 15-20 minutes. If you’re in a hurry, you can carefully transfer the entire baking sheet to the refrigerator for about 5-7 minutes to speed up the process. They’re ready when the candy coating is firm to the touch and doesn’t give when you press it lightly.
How to Serve and Share Your Edible Masterpieces
Once your wreaths are set and ready to shine, the fun really begins! These make the most stunning addition to any holiday cookie tray. Nestle them amongst classic sugar cookies and fudge for a pop of color and texture. They are also perfect for packaging! Stack them in a clear cellophane bag, tie them with a beautiful ribbon, and you have an incredibly thoughtful, handmade gift for teachers, mail carriers, friends, and neighbors. They’re a guaranteed smile-maker.
Get Creative! Fun Flavor Twists & Swaps
The classic version is divine, but don’t be afraid to play with your food! Here are a few ways to mix it up:
- Chocolate Peppermint: Use dark chocolate candy melts instead of green. Decorate with crushed candy canes for a classic holiday combo.
- White Christmas: Use white candy melts and decorate with blue and silver sprinkles for a beautiful, frosty look.
- Nutty Delight: After adding sprinkles, press a few chopped pecans, peanuts, or pretzel pieces into the coating for extra crunch and flavor.
- Fruity Fun: Use strawberry or cherry flavored candy melts and red sprinkles for a non-traditional, vibrant wreath. Perfect for Valentine’s Day!
- Dairy-Free Delight: Use dairy-free white chocolate and plant-based food coloring to accommodate allergies.
Olivia’s Chef Notes & Kitchen Confessions
This recipe has evolved so much from that first lopsided Christmas Eve attempt! My biggest lesson learned? The type of candy melt matters. I once tried to use a cheap, off-brand coating, and it never fully set, leaving me with a tray of delicious but tragically smeary wreaths. Now, I’m loyal to a couple of trusted brands I find at craft stores or the baking aisle.
And a funny story: one year, my dog, Barney, a golden retriever with a heart of gold and a stomach of steel, managed to quietly sneak an entire wreath off the counter. He didn’t eat it—oh no. He carefully carried it to his bed and simply licked all the candy coating and sprinkles off, leaving behind a sad, bare pile of pretzels. I couldn’t even be mad; it was too clever (and oddly neat)! So, consider this a warning to keep your creations safe from four-legged snack enthusiasts!
Your Questions, Answered!
Q: My candy coating is too thick and clumpy! What did I do wrong?
A: This usually means it got a little too hot. Candy melts can be finicky. If it’s too thick to dip smoothly, try adding a tiny, tiny amount of neutral oil (like coconut or vegetable) or paramount crystals (if you have them) and stirring vigorously. If it’s truly seized, it’s often best to start over. Remember, low heat and frequent stirring are your best friends!
Q: Can I make these ahead of time?
A: Absolutely! These are a great make-ahead treat. Once fully set, store them in a single layer in an airtight container at room temperature. They’ll stay fresh and crunchy for up to a week. For gifting, I usually make them no more than two days in advance to ensure maximum freshness.
Q: My sprinkles won’t stick! What’s the trick?
A: The key is timing. You have to add the sprinkles while the candy coating is still wet and tacky. If you finish a whole tray of wreaths first and then go back to add sprinkles, the coating will have already started to set. Work on one or two wreaths at a time: dip, place, layer, and immediately decorate before moving on to the next.
Q: The Twizzler bow won’t stay on. Help!
A: If the candy coating has already set when you try to add the bow, it won’t adhere. The fix is simple: use a tiny dab of the leftover melted candy as edible glue. Just touch a toothpick to the melted candy and put a small dot on the wreath where you want the bow, then press the bow onto it. It will harden and act as a perfect adhesive.

Pretzel Wreaths
Description
Here’s the treat that checks every holiday box—adorable, giftable, sweet, salty, and so easy. These edible wreaths need no oven time, just a little dipping, sprinkling, and bow-tying. They’re perfect for cookie trays, homemade gifts, or a fun kitchen project with kids. Get ready to make a snack that looks straight out of a bakery but takes just minutes to pull together!
Ingredients
-
1 bag mini pretzels (not snaps)
-
1 cup green candy melts (or white chocolate + gel food coloring)
-
Twizzlers Pull & Peel (for bows)
-
Holiday sprinkles of choice
-
Parchment paper
Instructions
-
Prep: Line a baking sheet with parchment. Have all ingredients ready.
-
Melt Coating: Microwave candy melts in 20-sec bursts, stirring until smooth. Add 1 tsp coconut oil if needed for fluidity.
-
First Layer: Dip pretzels into coating, shake off excess, and arrange 6–7 in a circle on parchment.
-
Second Layer: Repeat, layering more coated pretzels on top to build a full, sturdy wreath.
-
Decorate: While still wet, add sprinkles generously.
-
Add Bow: Separate two Twizzler strands, shape into a bow, and press onto the wreath with a dab of melted candy “glue.”
-
Set: Let rest 15–20 min at room temp or 5–7 min in the fridge until firm.
Notes
-
Peppermint Pop: Use dark chocolate + crushed candy canes.
-
Winter Wonderland: White melts + blue/silver sprinkles.
-
Nutty Crunch: Add chopped pecans or peanuts before the candy sets.
-
Allergy-Friendly: Use gluten-free pretzels + dairy-free candy coating.
Nutrition
- Calories: 110cal Per Serving
- Fat: 3g
- Carbohydrates: 20g
Quick Nutritional Info
Per Wreath (Approximate): ~110 calories | 3g fat | 20g carbs | 1g protein
Allergy Info: Contains gluten and dairy. Use gluten-free pretzels and dairy-free chocolate/candy melts to make this recipe gluten-free and dairy-free.
Final Thoughts: Your Holiday Kitchen Awaits
Well, my friend, there you have it—your complete guide to creating the most festive, fun, and foolproof holiday treat. These Sweet & Salty Pretzel Wreaths are so much more than just a recipe; they’re an invitation to slow down, get a little messy, and soak in the joy of the season.
Remember, perfection is not the goal here. A lopsided bow or a sprinkle avalanche just adds to the charm and the story. This is about the laughter that fills the kitchen, the pride of creating something beautiful with your own hands, and the simple pleasure of sharing something made with love.


