

Your New Favorite Holiday Baking Project is Here!
Hey there, friend! Come on in, the oven’s preheated and I’ve got a sprinkle-covered counter to prove we’re about to have some serious fun. Is there anything better than the smell of a cake baking during the holidays? That warm, sugary vanilla scent just seems to hug the whole house, doesn’t it? It’s pure magic. But what if I told you we could take that cozy feeling and add a huge dose of pure, unadulterated *wow* factor?
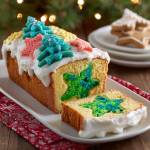
Today, we’re making my famous Holiday Surprise Inside Loaf Cake. This isn’t just any cake; it’s a delicious secret waiting to be revealed. Imagine the scene: you’ve just finished a lovely holiday meal. The conversation is flowing, everyone is full and happy. You bring out this beautifully frosted, unassuming loaf cake. There are oohs and aahs over the frosting. Then, you slice the first piece. A collective gasp fills the room. Right there, in the very center of the slice, is a perfect, brightly colored holiday shape—a Christmas tree, a star, a heart! The look on your loved ones’ faces is the absolute best reward. It’s a moment of genuine, childlike wonder, and you created it. The best part? It’s so much easier than it looks. I promise, with my step-by-step guide, you’ll feel like a baking wizard. So, tie on your favorite apron (the messy one with stories), and let’s create some kitchen magic together!
The Little Cake That Started It All
This recipe always takes me right back to my grandma’s kitchen, with its checkered curtains and the constant hum of her ancient stand mixer. One particularly chaotic Christmas Eve, when I was about ten, she decided we needed a “project” to keep my cousins and me from bouncing off the walls. She whipped up a simple vanilla batter, dyed half of it a shocking emerald green, and baked it in a thin sheet. With a rusty star-shaped cookie cutter, she carved out wobbly shapes and then did something that seemed utterly crazy to my young eyes: she stood them up in another pan and poured more batter on top!
We were convinced she’d lost it. But when that cake cooled and she sliced it, revealing a perfect green star in every single piece, our minds were completely blown. It felt like real magic. More than the sugar rush, I was hooked on the *idea* of it—that cooking could be playful, surprising, and a way to create joy for others. This loaf cake is my modern, slightly fancied-up homage to her. It’s my go-to recipe for bringing that same wide-eyed wonder to my own holiday table now. Every slice feels like a little gift, and a sweet nod to the woman who first showed me that the best recipes are the ones that come with a story.
Gathering Your Magical Ingredients
Here’s everything you’ll need to make the magic happen. I’m a big believer in keeping things simple and approachable, so we’re using a fantastic boxed mix as our base—it’s reliable, delicious, and lets us focus on the fun, creative part! Remember, baking is a science, but the decorations are pure art.
- 2 boxes Pillsbury White Cake Mix (plus the eggs, oil, and water called for on the box) – Using a classic white cake mix gives us a neutral, fluffy canvas that makes our colorful surprise pop! The Pillsbury brand is my favorite for this because it has a fine, tender crumb that holds the shape beautifully.
- Green Gel Food Coloring – I highly recommend gel food coloring over the liquid kind. The gels are much more concentrated, so you can get a vibrant, festive green (or red, or blue!) without adding extra liquid that could throw off the batter’s consistency. You’ll need just a tiny bit!
- 1 tub Pillsbury White Frosting – Again, we’re keeping it simple and delicious! This frosting is the perfect glue for our decorations and pipes like a dream. Feel free to use vanilla or even cream cheese flavor if you prefer.
- Crushed Holiday Cookies – This is where you can get creative! I used crushed-up peppermint sugar cookies for a little crunch and festive color. Sprinkles, crushed candy canes, or even red and green sanding sugar would be absolutely gorgeous here.
- Tree-Shaped Cookie Cutter (or any holiday shape!) – The star of the show! A tree is classic, but a star, heart, snowman, or even a bell would be utterly charming. Make sure it’s a size that will fit standing up in your loaf pan.
- Piping Bag fitted with a 1M Tip – This is my secret weapon for making any dessert look professionally pretty in seconds. The 1M tip creates those beautiful, classic swirls. If you don’t have a piping bag, a zip-top bag with the corner snipped off works in a pinch, though the swirls won’t be as defined.
Let’s Bake Some Magic: Step-by-Step
Okay, team! Let’s do this. Read through all the steps once before you begin—it helps the process feel smooth and stress-free. You’ve got this!
Step 1: Make the Surprise Shape Layer
First, preheat your oven to the temperature specified on your cake mix box (usually 350°F/175°C). Grease and flour a 9×13 inch baking pan, or line it with parchment paper for super easy removal. Now, prepare one box of the cake mix according to the package directions. This is where we add the magic potion! Add your gel food coloring, a little at a time, and stir until you achieve a deep, vibrant green (or your color of choice). You want it to be darker than you think—it will bake up slightly lighter. Pour the beautifully colored batter into your prepared pan and bake as directed. Let it cool completely in the pan on a wire rack. Chef’s Hack: Rushing this cooling step is the number one mistake! If the cake is even slightly warm, your shapes will tear and crumble. Patience, young grasshopper!
Step 2: Carve Your Shapes
Once the green cake layer is completely cool, run a knife around the edges and turn it out onto a cutting board. Now, take your holiday cookie cutter and press it firmly into the cake. Try to get as many shapes as you can from the sheet. Gently push the shaped pieces out. Don’t worry if they seem a little fragile; they’ll firm up even more. Pro Tip: If any pieces break, don’t despair! They make for a fantastic baker’s snack. You really only need 4-5 good, solid shapes for the loaf.
Step 3: Prepare the Loaf Base & Assemble
Reduce your oven temperature to 325°F (165°C). This lower temp helps the taller, denser loaf cake bake evenly without over-browning the outside. Grease and flour a 9×5 inch loaf pan thoroughly. Now, prepare the second box of cake mix, but leave this batter plain and white—this is our canvas! Pour a thin layer of the white batter into the bottom of your loaf pan, just enough to cover it. This is our foundation. Now, for the big moment! Take your green tree shapes and stand them upright, in a tight single row, down the center of the pan. They should be touching each other. The Key: They MUST stand up straight! Now, slowly and carefully, pour the remaining white batter around the sides and over the top of the trees. Use a spoon to help guide the batter and ensure it completely envelops the shapes. Tap the pan gently on the counter a few times to release any air bubbles.
Step 4: Bake to Perfection
Place the loaf pan in the center of your preheated oven. Because we’re baking a denser loaf, it will take longer than the box directions for the layer cake. Start checking for doneness at around 45-50 minutes. The true test? Insert a toothpick into the white batter part (not directly into a green tree). If it comes out clean or with a few moist crumbs, it’s done! The top should be a lovely golden brown. Let the cake cool in the pan for 15-20 minutes, then carefully turn it out onto a wire rack to cool completely. Absolutely no frosting a warm cake! I mean it. The frosting will melt into a sad, gloppy puddle.
Step 5: Decorate & Reveal!
Once the cake is totally cool, it’s time for the final flourish! Scoop your tub of frosting into the piping bag fitted with the 1M tip. Pipe generous swirls along the top of the loaf. If you’re new to piping, just practice a few swirls on a piece of parchment first—it’s easier than you think! Finally, sprinkle your crushed holiday cookies all over the frosting for that festive, crunchy finish. Now, the hardest part: waiting until you’re with your friends and family to slice it and reveal the surprise!
How to Serve Your Masterpiece
Presentation is part of the fun! Place the fully decorated loaf cake on a beautiful wooden cutting board or a long, elegant platter. Use a sharp, serrated knife to slice it—a gentle sawing motion will give you the cleanest cuts and the best reveal of that hidden shape. Wipe the knife clean between slices for picture-perfect presentation every time. Serve each slice on its own little plate. This cake is rich and sweet, so it needs no accompaniment, but a glass of cold milk, a hot cup of coffee, or even a dollop of lightly sweetened whipped cream on the side would be absolutely divine.
Get Creative: Endless Variations!
The beauty of this concept is that you can run with it! Here are a few ways to make this recipe your own:
- Peppermint Red & White: Use red food coloring for the inner shapes and add ½ tsp of peppermint extract to the white batter. Crush candy canes on top for garnish.
- Chocolate Lover’s Dream: Use a chocolate cake mix for the outer loaf and a bright red or green vanilla cake for the inside shapes. Frost with chocolate buttercream!
- Confetti Birthday Party: Make the inner shapes a fun color and add rainbow sprinkles to the white batter! Perfect for a birthday brunch.
- Lemon Blueberry: Add the zest of one lemon to the white batter and use blue food coloring for the inner shapes. Frost with a tangy lemon glaze instead of buttercream.
- Gluten-Free Friendly: Simply use your favorite gluten-free white cake mix and ensure your cookies for garnish are also GF!
Olivia’s Chef Notes & Kitchen Stories
I’ve made this cake more times than I can count, and it has evolved from my grandma’s wobbly stars into my signature holiday showstopper. One year, in a fit of over-enthusiasm, I used nearly a whole bottle of green food coloring. Let’s just say the inner trees were… electric. Vibrantly, alarmingly electric green. My husband joked that we were serving The Grinch cake. It was hilarious and still delicious, but I learned my lesson: a little gel color goes a very long way! Another time, I was rushing and didn’t get my shapes stood up perfectly straight. The resulting slices had charmingly lopsided, drunken-looking trees, which honestly got more laughs than perfect ones would have. So remember, even the “mistakes” can turn into happy accidents and great stories. The goal is fun and flavor, not perfection.
Your Questions, Answered!
Q: My inner shapes sunk to the bottom/moved during baking! What did I do wrong?
A: This usually happens for one of two reasons: 1) The bottom layer of white batter wasn’t thick enough to act as an anchor. Make sure you have a solid foundation before standing up your shapes. 2) The batter was too thin. If you feel your batter is runny, you can add 1-2 tablespoons of all-purpose flour to the second mix to thicken it slightly, which will help support the shapes.
Q: Can I make this from scratch instead of using a box mix?
A: Absolutely! Use your favorite vanilla cake recipe. You’ll need enough batter to fill one 9×13 inch pan (for the colored layer) and one 9×5 inch loaf pan (for the main cake). Just ensure your scratch recipe has a structure sturdy enough to hold the shapes—a classic butter cake works perfectly.
Q: Can I make this cake ahead of time?
A: You sure can! The baked, unfrosted loaf cake can be wrapped tightly in plastic wrap and stored at room temperature for one day, or frozen for up to a month. Thaw overnight before frosting. I highly recommend frosting it the day you plan to serve it for the freshest look and taste.
Q: My shapes are crumbling when I try to cut them! Help!
A: This is almost always because the green cake layer wasn’t 100% cool. It needs to be completely room temperature to be firm enough to cut cleanly. Pop it in the fridge for 15 minutes if you’re in a hurry!
Holiday Surprise Inside Loaf Cake
Description
A simple loaf cake with a hidden holiday shape inside—part magic trick, part dessert, and guaranteed to wow your guests. Each slice reveals a festive surprise, from a tree to a star to a heart, making this cake as fun to bake as it is to serve. It’s a story, a memory, and a celebration all in one bite.
Ingredients
-
2 boxes Pillsbury White Cake Mix (plus eggs, oil, water per box)
-
Green gel food coloring (or red/blue for variations)
-
1 tub Pillsbury White Frosting (or vanilla/cream cheese)
-
Crushed holiday cookies, sprinkles, or candy canes
-
Holiday cookie cutter (tree, star, heart, etc.)
-
Piping bag + 1M tip (or zip-top bag for swirls)
Instructions
-
Color & Bake Layer: Mix 1 box of cake, tint with gel coloring, bake in 9×13″ pan. Cool fully.
-
Cut Shapes: Use cookie cutter to press out holiday shapes. Set aside.
-
Assemble Loaf: Preheat oven to 325°F. Grease 9×5″ loaf pan. Mix 2nd box of cake. Pour thin layer of white batter, stand colored shapes upright in a row, cover fully with remaining batter.
-
Bake: 45–55 min, until toothpick in white cake comes out clean. Cool completely.
-
Frost & Decorate: Pipe frosting swirls on top, sprinkle crushed cookies or candy.
-
Serve & Reveal: Slice with a serrated knife for the big “wow” moment!
Notes
-
Peppermint Red & White: Red shapes, peppermint extract, candy cane topping.
-
Chocolate Dream: Chocolate loaf with bright red or green shapes.
-
Confetti Party: Rainbow sprinkles in batter + colorful shapes.
-
Lemon Blueberry: Lemon zest in batter + blue shapes, glaze instead of frosting.
Nutrition
- Calories: 290 cal Per Slice
- Fat: 12g
- Carbohydrates: 40g
Nutritional Information (Approximate)
Per slice (based on 12 slices): 290 calories | 12g fat | 40g carbs | 2g protein. Please note this is an estimate and can vary based on specific brands of ingredients used and any substitutions.
ts! This easy holiday loaf cake hides a festive surprise inside. A fun & magical baking project for all!
Final Thoughts: You’re Ready to Create the Magic
And there you have it! Your step-by-step guide to creating a holiday moment that’s equal parts baking and pure, unadulterated joy. This Holiday Surprise Inside Loaf Cake is more than just a dessert; it’s a conversation starter, a memory maker, and a beautiful way to share a piece of your heart (and your kitchen) with the people you love.
Remember, the true secret ingredient here isn’t the green food coloring or the perfect frosting swirl—it’s the spirit of playfulness. Whether your trees stand perfectly straight or lean with charming character, whether your frosting is pristine or delightfully messy, what matters is the love and the story baked into every slice.
So, don your apron, embrace the sprinkle-covered counter, and preheat that oven. You are not just baking a cake; you are crafting an experience, a moment of wide-eyed wonder that your friends and family will be talking about long after the last crumb is gone.


