

Welcome to the Coziest Corner of the Kitchen!
Hey there, friend! Come on in, grab an apron, and get ready to fill your kitchen with the most incredible aroma. You know that moment when you walk into a house and smell something sweet, buttery, and nutty baking in the oven? That instant feeling of warmth and welcome? That’s exactly what we’re creating today. We’re taking everything we adore about a classic, soul-warming pecan pie and transforming it into a delightfully handheld, bite-sized treat: Pecan Pie Cookie Cups. Imagine a soft, buttery vanilla cookie cup that cradles a gooey, rich, and perfectly sweet pecan filling. It’s the ultimate dessert mashup, and I promise, it’s about to become your new favorite thing to bake. Whether you’re prepping for a holiday cookie swap, need a stunning addition to your dessert board, or simply want to treat yourself on a Tuesday afternoon, these little cups of joy are the answer. They deliver all the flavor of a traditional pie without the commitment of slicing and serving, making them the ultimate fuss-free, crowd-pleasing superstar. So, let’s preheat those ovens and turn up the fun—we’re about to make some magic!
The Day I Ditched the Pie Plate
This recipe was born from a little bit of chaos and a whole lot of love, as the best recipes often are. A few years ago, I was in charge of dessert for our big family Thanksgiving. The menu was set: turkey, stuffing, the works… and of course, my grandfather’s famous pecan pie. Well, in the glorious hustle of the day, with cousins running underfoot and dogs begging for scraps, I somehow managed to overfill the pie crust. What emerged from the oven was… abstract. A delicious, caramelized, sticky mess that had bubbled over and welded itself to the oven floor. It had soul, but it wasn’t winning any beauty contests. Panic set in! But then, I looked at the bowl of leftover filling and the ball of pie dough I had reserved. In a “nothing left to lose” moment, I pressed little bits of the dough into a muffin tin, poured in the extra filling, and crossed my fingers. Fifteen minutes later, I pulled out these perfect, golden, individual pecan pie cups. They were a revelation! Not only did they save the day, but they were arguably better—each person got their own perfect, gooey-to-crust ratio. Now, I use a simple cookie dough for an even easier, more versatile base, but the spirit of that happy kitchen accident lives on in every batch.
Gathering Your Kitchen Crew (The Ingredients!)
Here’s your shopping list! These are simple, pantry-friendly ingredients that work together to create something truly special.
For the Cookie Base:
- ½ cup unsalted butter, softened: This is the foundation of our rich, tender cookie cup. Using unsalted lets us control the salt level. Chef’s Tip: True “softened” butter should give slightly when you press it but still hold its shape. Too melty and your cups might spread!
- ½ cup granulated sugar: It sweetens the dough and helps create a lovely light texture when creamed with the butter.
- 1 large egg yolk: The yolk adds richness and helps bind our dough without making it too cakey. Save the white for a healthy omelet tomorrow!
- 1 tsp vanilla extract: Pure vanilla is my go-to for that warm, classic flavor that complements the pecans so beautifully.
- 1¼ cups all-purpose flour: The structure of our cookie cup. Spoon and level it into your measuring cup to avoid a dense, dry dough.
- ¼ tsp salt: Never skip this! Salt is the flavor enhancer that makes the sweet ingredients truly sing.
For the Pecan Filling:
- ½ cup chopped pecans: The star of the show! I like to chop them roughly for great texture. Toasting them beforehand (350°F for 5-7 minutes) will unlock an incredible, deep nutty flavor.
- ¼ cup packed brown sugar: Pack it firmly into your measuring cup. Its molasses notes are essential for that classic, caramely pecan pie taste.
- ¼ cup light corn syrup: This is the key to the signature gooey, glossy filling. Substitution Tip: Pure maple syrup or honey can work in a pinch, but the texture and flavor will be slightly different.
- 1 tbsp unsalted butter, melted: Added richness for a luxurious filling.
- ½ tsp vanilla extract: A second hit of vanilla in the filling ties everything together.
- Pinch of salt: Balances the sweetness and elevates all the other flavors in the filling.
Let’s Get Baking: The Fun Part!
Ready to create? Follow these steps for perfect little cookie cups every single time.
- Preheat and Prep: Preheat your oven to 350°F (175°C). This is non-negotiable for even baking! Generously grease a mini muffin pan with butter or non-stick spray. This ensures our cookie cups pop out easily after their bake. Chef’s Hack: If you’re nervous about sticking, you can use mini muffin liners for absolute insurance.
- Cream the Butter & Sugar: In a medium bowl, use a hand mixer (or some good old-fashioned elbow grease with a wooden spoon) to cream together the softened butter and granulated sugar. We’re looking for it to become light, pale yellow, and fluffy. This step incorporates air, which is the secret to a tender cookie base. This should take about 2 minutes with a mixer.
- Add Wet Ingredients: Beat in the single egg yolk and the teaspoon of vanilla extract. Mix just until they are fully incorporated. Scrape down the sides of the bowl with a spatula to make sure everything is getting to know each other.
- Bring in the Dry Goods: Add the flour and salt to the bowl. Now, switch to mixing with a spatula or wooden spoon. Mix until a soft, cohesive dough forms. It might seem crumbly at first, but it will come together as you mix. Don’t overmix! We want tender cups, not tough ones.
- Form the Cups: Divide your dough into 12 equal pieces. Roll each piece into a smooth ball. Press each ball firmly into the bottom and up the sides of each prepared mini muffin cup, forming a little well. I like to use my fingers or the back of a small, rounded measuring spoon to help shape a perfect, even cup. Make sure the dough goes about halfway up the sides.
- Whisk the Filling: In a separate small bowl, combine all the filling ingredients: the chopped pecans, packed brown sugar, corn syrup, melted butter, vanilla, and that all-important pinch of salt. Stir it until everything is beautifully combined and glossy.
- Fill ‘Em Up: Spoon a heaping teaspoon of the pecan filling mixture into each cookie dough cup. It’s okay if it looks like a lot—the filling will bubble and settle as it bakes. You should use it all up!
- Bake to Perfection: Slide the pan into your preheated oven and bake for 14-16 minutes. You’ll know they’re done when the edges of the cookie cups are a light golden brown and the pecan filling is actively bubbling all over. That bubbling is your sign that the sugar has caramelized perfectly.
- The All-Important Cool Down: This is the hardest part: patience! Remove the pan from the oven and let it cool on a wire rack for at least 10 minutes. The filling is molten lava right now and needs time to set. After 10 minutes, you can gently use a small offset spatula or butter knife to coax each cookie cup out of the pan. Transfer them to the wire rack to cool completely. They will firm up as they cool, revealing their perfect, gooey texture.
How to Serve These Little Treasures
Presentation is part of the fun! Arrange these gorgeous Pecan Pie Cookie Cups on a beautiful rustic wooden board or a vintage cake stand. For a truly decadent touch, add a tiny dollop of freshly whipped cream or a small scoop of vanilla bean ice cream on the side. The contrast of the warm, gooey cup with the cold, creamy ice cream is pure heaven. They’re the perfect self-contained dessert for a party—no plates or forks needed, just happy fingers and smiling faces!
Mix It Up! Creative Twists
Once you’ve mastered the classic, the world is your oyster! Try these fun variations:
- Chocolate Drizzle: Melt some dark or milk chocolate and drizzle it over the cooled cups for an elegant finish.
- Bourbon Kissed: Add ½ tablespoon of bourbon to the pecan filling for a wonderfully warm, adult-friendly depth of flavor.
- Salty Sweet: Finish the baked cups with a light sprinkle of flaky sea salt right when they come out of the oven.
- Cranberry Pecan: Fold 2 tablespoons of dried cranberries into the filling for a festive, tart twist.
- Gluten-Free: Swap the all-purpose flour for a 1:1 gluten-free baking blend to make everyone at the table happy.
Olivia’s Chef Notes & Kitchen Stories
This recipe has become a staple in my home, especially during the holidays. I’ve probably made a hundred batches by now! My biggest lesson learned? That 10-minute cooling time in the pan is not a suggestion—it’s a commandment. I once got impatient and tried to remove one immediately. Let’s just say I had to eat the evidence to hide my mistake (it was still delicious, just structurally… challenged). Over time, I’ve started toasting my pecans without fail—it adds such a profound nuttiness. I’ve also learned that this dough is incredibly forgiving. If you think you’ve pressed it too thin, just patch it with a little extra dough. No one will ever know! These little cups are about joy, not perfection. So put on some music, enjoy the process, and get ready for the compliments to roll in.
Your Questions, Answered!
Q: My filling overflowed! What happened?
A: Don’t worry, it happens! This usually means the wells in your cookie dough weren’t quite deep enough or the filling was *slightly* overfilled. It’s a cosmetic issue—they’ll still taste amazing. Next time, really press that dough up the sides to create a sturdy barrier. Placing a baking sheet on the rack below your muffin pan can catch any drips for easier clean-up.
Q: Can I make these ahead of time?
A: Absolutely! These are a great make-ahead dessert. Once completely cooled, store them in an airtight container at room temperature for up to 2 days. The cookie base might soften slightly from the filling, but they’re still delicious. You can also freeze them for up to 2 months.
Q: My cookie cups are stuck in the pan. Help!
A: First, ensure you greased the pan thoroughly. If they’re stuck, don’t force them! Let the pan cool completely. Then, gently run a thin knife or offset spatula around the edges again. Sometimes a little gentle twisting motion can help release them. For next time, the mini muffin liners are a foolproof solution.
Q: Can I use a regular muffin pan?
A: You can, but you’ll get fewer cookie cups (probably about 6-8), and the baking time will need to be increased by 3-5 minutes. Keep a close eye on them until the edges are golden and the filling is bubbly.
Pecan Pie Cookie Cups
Description
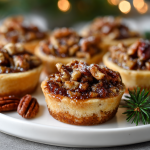
All the rich, nutty magic of pecan pie—reimagined into adorable, handheld cookie cups. A buttery vanilla cookie base cradles gooey caramel-pecan filling, creating the perfect balance of crisp, chewy, and melt-in-your-mouth sweetness. They’re fuss-free, crowd-pleasing, and guaranteed to disappear fast—whether on a holiday dessert board, at a cookie swap, or as a well-earned Tuesday treat.
Ingredients
Cookie Base:
-
½ cup unsalted butter, softened
-
½ cup granulated sugar
-
1 large egg yolk
-
1 tsp vanilla extract
-
1¼ cups all-purpose flour
-
¼ tsp salt
Pecan Filling:
-
½ cup chopped pecans (toasted if possible)
-
¼ cup packed brown sugar
-
¼ cup light corn syrup (or maple/honey substitute)
-
1 tbsp unsalted butter, melted
-
½ tsp vanilla extract
-
Pinch of salt
Instructions
-
Preheat oven to 350°F (175°C). Grease a mini muffin pan.
-
Cream butter & sugar until light and fluffy (2 min).
-
Mix in egg yolk and vanilla. Stir in flour and salt until a soft dough forms.
-
Shape 12 dough balls. Press into muffin wells, forming cups up the sides.
-
Whisk filling ingredients together until glossy.
-
Spoon filling into each cup (about 1 heaping tsp).
-
Bake 14–16 min, until cookie edges are golden and filling is bubbling.
-
Cool in pan 10 min, then gently remove and let cool fully.
Notes
-
Chocolate drizzle: Add melted chocolate over cooled cups.
-
Bourbon twist: Stir ½ tbsp bourbon into filling.
-
Salty finish: Sprinkle flaky sea salt right after baking.
-
Festive flair: Add a few dried cranberries to the filling.
Nutrition
- Calories: 210 cal Per Cookie
- Fat: 12g
- Carbohydrates: 24g
Nutritional Information*
Per Cookie Cup (approx): 210 calories | 12g fat | 24g carbs | 2g protein
*This information is provided as a courtesy and is an estimate only. Please note that nutritional information may vary based on the specific brands of products used. We recommend calculating the nutritional information based on the specific ingredients you use.
Final Thoughts: Your New Go-To Recipe Awaits
And there you have it! From a kitchen mishap to a cherished recipe, these Pecan Pie Cookie Cups are proof that the best creations often come from a little bit of love and a happy accident.
They truly are the perfect little package: all the nostalgic, soul-warming flavor of a classic pecan pie, baked into a portable, shareable, and utterly adorable treat. Whether they’re the star of your holiday table, a gift for a neighbor, or a special weeknight indulgence, they’re guaranteed to make any moment feel a little more cozy and celebratory.


