
Your New Favorite Dinner: Savory, Juicy & Simple Roasted Turkey Drumsticks
Hey there, friend! Come on in, pull up a stool, and let’s talk about one of my all-time favorite ways to get a seriously impressive, deeply satisfying meal on the table without any of the fuss. I’m talking about roasted turkey drumsticks. Now, I know what you might be thinking—turkey is just for Thanksgiving, right? Wrong! So wonderfully, deliciously wrong.
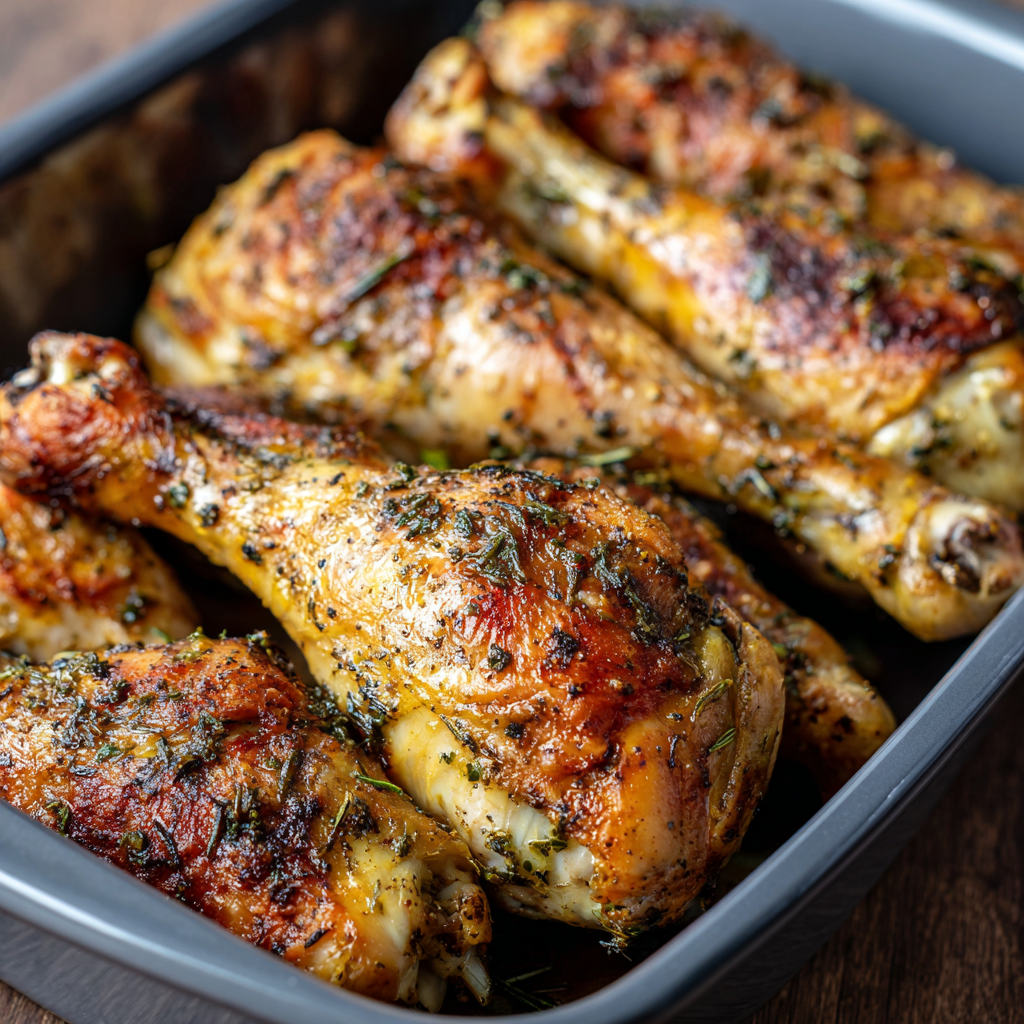
Turkey legs are the unsung heroes of the poultry world. They’re incredibly flavorful, surprisingly budget-friendly, and they deliver that classic, nostalgic roasted flavor in a perfectly portioned package. No wrestling with a giant bird, no hours of brining, and definitely no dry meat. We’re aiming for crackling-crisp skin that gives way to the most tender, juicy, fall-off-the-bone meat you’ve ever tasted. It’s the kind of meal that makes everyone gather in the kitchen, noses in the air, asking “what is that amazing smell?!” exactly 30 seconds after it goes in the oven. The best part? It’s deceptively simple. You don’t need any fancy skills, just a few good spices and a little bit of love. So, tie on your apron (the messy one, you know the one), and let’s make something unforgettable together.
The Snowy Day & The Great Turkey Leg Experiment
This recipe brings me right back to one particularly snowy December a few years ago. My husband and I had planned a big, festive holiday party, but a massive blizzard rolled in and one by one, all our guests had to cancel. There we were, staring at a fully defrosted… single turkey leg. I’d bought it on a whim at the farmer’s market, intending to test a recipe, and suddenly it was our impromptu Christmas dinner for two.
Instead of being disappointed, we turned it into an event. We lit every candle in the house, put on our favorite holiday jazz album, and opened a bottle of red wine. I whipped up this simple rub, and the smell of garlic, paprika, and rosemary roasting filled our tiny kitchen with the most incredible warmth. We ate those giant, juicy drumsticks straight off the bone, with our fingers, laughing like kids. It was messy, it was cozy, and it was absolutely perfect. It taught me that a special meal isn’t about the occasion or the number of people around the table; it’s about the joy you pour into it. Now, every time I make these, I get a little glimpse of that magical, snowy night.
Gathering Your Flavor Arsenal
Here’s the beautiful part: the ingredient list is short, sweet, and probably already in your pantry. This is where we build layers of flavor, from the inside out!
- 4 turkey drumsticks (about 3–4 lbs total): The star of the show! Look for drumsticks with plump, pink skin. Don’t worry if they seem huge; they shrink a bit as they cook. Pro tip: if you have time, let them sit uncovered on a plate in the fridge for an hour or two before cooking. This helps dry the skin out, which is the secret to ultra-crispiness!
- 2 tbsp olive oil: Our flavor conductor! It helps the spice rub stick and creates that beautiful, golden exterior. Avocado oil works great here too for its high smoke point.
- 1 tsp salt: Essential for enhancing all the natural flavors of the turkey. I use kosher salt for its clean taste.
- ½ tsp black pepper: Freshly cracked is always best for a little sharp, pungent kick.
- 1 tsp smoked paprika: This is my not-so-secret weapon. It doesn’t add heat, but it gives a gorgeous deep red color and a subtle, smoky sweetness that makes the turkey taste like it’s been slow-smoking for hours.
- 1 tsp garlic powder & 1 tsp onion powder: The dynamic duo of savory flavor. They create a robust, all-over seasoning that permeates the meat perfectly. Fresh garlic can burn, but the powders give us consistent, delicious flavor.
- 1 tsp dried thyme or rosemary: Hello, cozy aroma! I adore thyme with poultry, but rosemary brings a powerful, piney warmth. Use what you love! If you have fresh, chop it finely—you’ll need about 1 tablespoon.
- 1 cup chicken or turkey broth: This is our kitchen hack for incredibly moist meat. As it roasts, it creates a steamy environment in the pan and gives us delicious juices for basting. Low-sodium is best so you can control the salt level.
Let’s Get Roasting! Your Foolproof Steps to Perfection
Ready? This is where the magic happens. Follow these steps, and you are guaranteed a show-stopping result.
- Preheat and Prep: First things first, get that oven preheated to 375°F (190°C). Position a rack in the center of the oven. While it’s heating, take your turkey drumsticks and pat them completely dry with paper towels. This is the SINGLE MOST IMPORTANT STEP for crispy skin. Any moisture on the surface will just steam the skin instead of browning it. Be thorough!
- Create the Flavor Paste: In a small bowl, mix together the olive oil, salt, pepper, smoked paprika, garlic powder, onion powder, and your chosen herb. It should form a lovely, fragrant paste. Don’t be shy here! Using your hands (the best tools you have!), rub this mixture all over every inch of the drumsticks. Get under the skin if you can, and really massage it in. Let them sit for 10 minutes while the oven finishes preheating to let the flavors meld.
- Pan and Broth: Place the seasoned drumsticks in a roasting pan or a sturdy baking dish with sides. You don’t want them crammed in; a little space is good. Now, carefully pour the 1 cup of broth into the bottom of the pan. Important: Pour it around the drumsticks, not over them! We worked hard on that dry skin, we don’t want to make it wet again. The broth will steam up and keep the meat incredibly juicy while the skin above it roasts to perfection.
- The First Roast (The Tenderizing Phase): Loosely cover the pan with aluminum foil. This creates a little steam oven that gently cooks the meat, tenderizing it without drying it out. Slide the pan into your preheated oven and roast for 45 minutes.
- Uncover, Baste, and Crisp! After 45 minutes, carefully remove the pan from the oven (it’s steamy!). Take off the foil and behold the glorious, partially cooked drumsticks! Using a spoon or a baster, gather up the flavorful juices from the bottom of the pan and drizzle them all over the drumsticks. This is like giving them a flavor shower. Now, return the pan to the oven, uncovered, for the final 30-40 minutes. This is where the skin will transform into a crispy, crackly, golden-brown masterpiece.
- The Final Test: The drumsticks are done when the skin is deeply browned and an instant-read thermometer inserted into the thickest part of the meat (without touching the bone) reads 175°F. The meat will be juicy and tender at this temperature. If you’re unsure, you can give the meat a little pull with a fork; it should be starting to fall apart easily.
- Rest is Best: This is the hardest part, I know! But you must let the drumsticks rest for 10 minutes after pulling them out of the oven. Tent them loosely with the foil you used earlier. This allows the frantic, hot juices inside the meat to relax and redistribute. If you cut into them right away, all those precious juices will run out onto the cutting board, leaving you with drier meat. Trust me, it’s worth the wait!
How to Serve These Beautiful Drumsticks
Presentation is part of the fun! For a real “wow” factor, serve these drumsticks whole on a large, rustic platter. Drizzle a little of the pan juices over the top and sprinkle with some fresh chopped parsley or thyme for a pop of color. They are a hands-on meal, so provide plenty of napkins! I love to serve them alongside the roasted root vegetables that cooked right in the pan with them (see variations below) and a big, fluffy pile of mashed potatoes or creamy polenta to soak up every last drop of that incredible juice. It’s a feast for the eyes and the soul.
Make It Your Own: Delicious Variations
The beauty of this recipe is its flexibility. Play around and find your family’s favorite version!
- Citrus Herb: Add the zest of one lemon and one orange to the spice rub. Place a few slices of the citrus fruits in the bottom of the pan with the broth for a bright, sunny flavor.
- Cozy Root Veggie Feast: In the first step, toss 2 cups of chopped carrots, potatoes, parsnips, and onions in a tablespoon of the oil and spice mix. Scatter them around the drumsticks in the pan. They’ll roast in the turkey drippings and become the most delicious side dish imaginable.
- Balsamic & Honey Glaze: For the last 15 minutes of cooking, brush the drumsticks with a mix of 2 tbsp balsamic vinegar and 1 tbsp honey. Return to oven to caramelize into a sticky, sweet, and savory glaze.
- Spicy Kick: Add ½ tsp of cayenne pepper or chipotle powder to the rub for a warm, smoky heat that builds with every bite.
- Mustard Herb: Swap the olive oil for 2 tbsp of whole-grain Dijon mustard in the rub. It creates a fantastic crust and adds a tangy depth of flavor.
Olivia’s Chef Notes & Kitchen Stories
This recipe has become a true workhorse in my kitchen. I’ve made it for busy weeknights, for last-minute guests, and even for a quirky, non-traditional “Turkey Leg Thanksgiving” with close friends. It has never, ever let me down. One time, I was filming a quick video of me taking them out of the oven, and I was so excited by how gorgeous they looked that I completely forgot to use a potholder. Let’s just say the pan handle taught me a very quick, very memorable lesson about kitchen safety! (The turkey legs were still delicious, and my pride was the only thing that was wounded.) Over time, I’ve learned that a heavier roasting pan yields even crispier skin because it distributes heat more evenly, but a simple baking dish works perfectly too. Don’t overthink it. The real secret ingredient is always the joy you bring to the process.
Your Questions, Answered!
Q: My skin isn’t as crispy as I’d like. What did I do wrong?
A: The number one culprit is not drying the skin enough before seasoning. Moisture is the enemy of crispiness! Make sure you pat it very thoroughly. Also, ensure your oven is fully preheated and that you’re roasting uncovered for the full final 30-40 minutes. If it’s still not crisp enough, you can pop them under the broiler for 2-3 minutes at the very end, but watch them like a hawk!
Q: Can I use frozen turkey drumsticks?
A: Absolutely! The key is to thaw them safely and completely. The best way is to move them from the freezer to the refrigerator 24-48 hours before you plan to cook. Once fully thawed, pat them extremely dry before proceeding with the recipe. Cooking from frozen is not recommended as the outside will overcook before the inside is safe to eat.
Q: The meat is tender but still pink near the bone. Is it safe?
A: This is a common and totally safe occurrence with turkey legs! The bone can release a protein called myoglobin during cooking, which can tint the surrounding meat a pinkish hue, even when the turkey is fully cooked to a safe temperature. Always trust your thermometer. If it reads 175°F in the thickest part of the meat, it is done and safe to eat.
Q: Can I make this with chicken legs instead?
A: You sure can! The cooking principle is the same, but the time will be less. Chicken legs will likely be done after 25-30 minutes covered and 20-25 minutes uncovered. Always use a thermometer and cook until the internal temperature reaches 175°F.

Roasted Turkey Drumsticks
Description
No giant bird, no stress, just perfectly portioned turkey legs with golden, crispy skin and fall-off-the-bone meat. A true weeknight hero—or a festive showstopper!
Ingredients
-
4 turkey drumsticks (3–4 lbs total)
-
2 tbsp olive oil (or avocado oil)
-
1 tsp kosher salt
-
½ tsp freshly cracked black pepper
-
1 tsp smoked paprika
-
1 tsp garlic powder
-
1 tsp onion powder
-
1 tsp dried thyme or rosemary (or 1 tbsp fresh, finely chopped)
-
1 cup chicken or turkey broth (low-sodium preferred)
Instructions
1. Preheat & Prep
Set oven to 375°F (190°C). Pat drumsticks completely dry with paper towels—this is crucial for crispy skin.
2. Make the Flavor Paste
Mix oil, salt, pepper, paprika, garlic powder, onion powder, and herbs into a paste. Rub all over drumsticks (get under the skin if possible).
3. Pan Setup
Place drumsticks in a roasting pan or baking dish. Pour broth into the pan around (not over) the meat.
4. Tenderizing Phase
Cover loosely with foil. Roast 45 minutes.
5. Crisping Phase
Remove foil, baste with pan juices, and return to oven uncovered. Roast another 30–40 minutes, until skin is golden and internal temp reaches 175°F.
6. Rest & Serve
Tent with foil and rest 10 minutes before serving. This locks in the juices.
Notes
-
Citrus Herb → Add zest of 1 lemon + 1 orange to rub, place slices in pan.
-
Root Veggie Feast → Toss carrots, potatoes, onions in spice mix; roast alongside drumsticks.
-
Balsamic Honey Glaze → Brush with 2 tbsp balsamic + 1 tbsp honey in last 15 minutes.
-
Spicy Kick → Add ½ tsp cayenne or chipotle powder to rub.
-
Mustard Herb → Swap oil for 2 tbsp whole-grain Dijon mustard in rub.
Nutrition
- Calories: 310 cal Per Serving
- Fat: 18g
- Carbohydrates: 1g
- Protein: 36g
Nutritional Information*
*This is an estimate for 1 drumstick (assuming 4 drumsticks total) and will vary based on the exact size of the drumsticks and specific ingredients used.
Per Serving (approx.): Calories: 310 | Protein: 36g | Carbohydrates: 1g | Fat: 18g
Final Thoughts: More Than Just a Meal
So there you have it. What might have seemed like a humble ingredient has been transformed into a centerpiece-worthy feast. These roasted turkey drumsticks are proof that the most memorable meals aren’t about complexity or grand gestures, but about simplicity, heart, and a few good spices.
They’re a reminder that you can create magic on a random Tuesday, that a little bit of crispiness can cure a bad day, and that the best recipes are the ones that leave your kitchen smelling like a home and your family asking for seconds.
I hope this recipe becomes a trusted friend in your kitchen, just like it is in mine. I hope it gives you a reason to light a few candles, put on some music, and turn an ordinary evening into a tiny celebration. Most of all, I hope it gives you the confidence to get a little messy, to trust your instincts, and to create your own delicious stories, one perfectly roasted drumstick at a time.


