

Your New Favorite Bite of Cloud-Like Heaven
Hey there, friend! Come on in, grab an apron, and let’s get ready to bake something that feels like a warm, delicious hug. If you’ve ever dreamed of biting into a dessert that’s simultaneously rich and light, decadent and airy, then you, my friend, are in for the absolute best treat. Today, we’re whipping up the most magical little confections: Japanese Cotton Cheesecake Cupcakes!
Imagine the classic New York cheesecake’s elegant, softer, and incredibly graceful cousin. Now, imagine that cousin decided to get fun-sized and even more charming. That’s exactly what these cupcakes are. They have that iconic, gentle jiggle, a melt-in-your-mouth texture that’s closer to a soufflé than a dense cake, and a delicate sweetness that won’t leave you in a sugar coma. They’re perfect for parties, afternoon tea, or that moment when you need a little bite of joy without the commitment of a whole slice. The best part? They look fancy and technically impressive, but I promise, with a few key tips from my kitchen to yours, they are completely achievable. So, let’s preheat that oven and turn simple ingredients into something truly unforgettable!
A Cake That Built a Bridge
My love affair with Japanese cotton cheesecake started on a rainy afternoon in a tiny, steam-fogged bakery in Vancouver. I was visiting a dear friend, and she insisted we try this “amazing jiggly cake” she’d been obsessed with. I’ll be honest, I was skeptical. I was a die-hard New York-style girl, all about that dense, tangy, crumbly crust life. But one bite… oh, one bite was all it took. It was like eating a sweet cloud. It was ethereal. It was a complete game-changer.
I came home desperate to recreate that magic, but my first few attempts were… well, let’s just call them delicious learning experiences. They were deliciously dense, or slightly sunken, but never quite that perfect, airy lift. It became my kitchen white whale. I called my friend after every attempt, and we’d laugh about my “cheesecake pancakes.” Finally, after more eggs than I care to admit, I nailed it. The triumphant text I sent her—a video of that perfect, gentle jiggle—is still a core memory for me. It’s more than a recipe; it’s a story of friendship, persistence, and the universal joy of sharing a perfect bite with someone you love. Turning it into cupcakes felt like the natural next step—sharing that joy in individual, perfectly-portioned packages.
Gathering Your Cloud-Making Supplies
Here’s everything you’ll need. The ingredients are simple, but each one plays a starring role in creating that iconic texture. Don’t worry, I’ve included all my best substitution tips and chef insights!
- 125g Cream Cheese, softened: This is the heart of the flavor. Full-fat is non-negotiable here for the right richness and structure. Take it out of the fridge at least an hour ahead. In a pinch, you can soften it in 15-second bursts in the microwave, but be careful not to melt it!
- 25g Unsalted Butter: Adds richness and a velvety mouthfeel. If you only have salted butter, that’s okay! Just omit the pinch of salt later on.
- 50ml Milk: Whole milk is ideal for the fat content, but 2% will work in a pinch. This helps to thin the batter and create a smoother consistency.
- 3 Eggs, separated: This is the magic trick! The yolks add richness and emulsify the batter, while the whites, when whipped, are what give the cake its incredible rise and airy texture. Make sure your eggs are at room temperature; this helps the whites whip up to a greater volume.
- 60g Sugar: We’re using granulated white sugar. It’s not a super sweet cake, so this amount is perfect. We’ll add it all to the egg whites to help stabilize the meringue.
- 30g Cake Flour: Cake flour has a lower protein content than all-purpose, which results in a more tender, delicate crumb. If you need to substitute, use 28g of all-purpose flour and 2g of cornstarch.
- 10g Cornstarch: This helps to stabilize the structure further and contributes to the soft, cottony texture. Don’t skip it!
- 1/2 tbsp Lemon Juice: This little bit of acid brightens the flavor and cuts through the richness of the cream cheese. You won’t taste “lemon,” I promise! You can also use white vinegar if that’s all you have.
- Pinch of Cream of Tartar or Salt: Another superstar for stability! Cream of tartar is an acid that helps the egg whites form stiff, stable peaks. If you don’t have it, a tiny pinch of salt works almost as well.
Let’s Create Some Magic: Step-by-Step
Okay, team! Here we go. Read through all the steps once before you begin. It’s a simple process, but the technique is key. You’ve got this!
Step 1: Preheat your oven to 320°F (160°C). This is a low and slow bake, which is crucial for that even, gentle rise without browning too much. Line a muffin tin with 6-8 cupcake liners. I find this recipe makes a perfect 7, so don’t worry if they’re not all perfectly even! Pro Tip: Double-line your tin or use higher-quality, thicker liners. This helps insulate the sides and promotes a more even rise.
Step 2: In a heatproof bowl, combine the cream cheese, butter, and milk. Set the bowl over a pot of simmering water (a double boiler), making sure the bottom of the bowl isn’t touching the water. Heat, whisking occasionally, until the mixture is completely smooth and lump-free. Chef’s Hack: No double boiler? A metal bowl placed snugly on top of a saucepan works perfectly! Just use oven mitts, as the bowl will get hot. Remove from heat and let it cool slightly. You don’t want it so hot that it cooks the egg yolks in the next step.
Step 3: Whisk the egg yolks into the warm cream cheese mixture, one at a time, until fully incorporated. Then, sift in the cake flour and cornstarch. Sifting is important here to avoid lumps! Whisk until you have a beautifully smooth, pale yellow batter. Stir in the lemon juice. Set this aside.
Step 4: In a spotlessly clean, grease-free bowl, beat your egg whites with the cream of tartar (or salt) until they become foamy. Gradually add the sugar, about a tablespoon at a time, while beating continuously. Keep beating until you reach stiff peaks. This means when you lift the beaters out, the peaks stand straight up and don’t droop. Pro Tip: How to tell if your bowl is clean? Any trace of grease or yolk will prevent the whites from whipping properly. Give your bowl a quick wipe with a little lemon juice or vinegar before you start to be safe!
Step 5: This is the most important step: folding. Add about one-third of the meringue to the yolk batter. Use a spatula to gently fold it in by cutting down through the middle, sliding along the bottom of the bowl, and folding it over on top. Rotate the bowl as you go. This incorporates air. Once that first third is mostly mixed in, add the next third. Be patient and gentle! Finally, fold in the last of the meringue until you have a uniform, light, and airy batter. No white streaks should remain.
Step 6: Carefully spoon the batter into your prepared liners, filling them about 3/4 of the way full. Now, for the secret weapon: the water bath (bain-marie). Place your muffin tin inside a larger, deep baking tray (a roasting pan works great). Pour hot water from a kettle into the larger tray, about halfway up the sides of the muffin tin. This creates steam in the oven, which is the key to that moist, jiggly, soufflé-like texture and prevents cracking.
Step 7: Carefully transfer the whole setup to the preheated oven. Bake for 25-30 minutes. The tops should be a light golden color and feel set to the touch. DO NOT open the oven door! When the time is up, turn off the oven. Crack the oven door open slightly (I use a wooden spoon to keep it ajar) and let the cupcakes sit inside for 10 minutes. This gradual temperature change prevents them from collapsing. Then, remove them from the oven and the water bath, and let them cool completely in the muffin tin on a wire rack. They will deflate slightly—this is normal and gives them that classic cotton cheesecake look!
How to Serve These Little Clouds of Joy
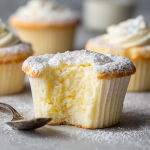
The beauty of these cupcakes is that they are utterly elegant all on their own. They need no frosting, no glaze, no fuss. I love serving them simply with a delicate dusting of powdered sugar right before serving. For a pop of color and a hint of tartness, place a single perfect raspberry, blueberry, or a slice of strawberry on top. They are fantastic slightly warm, at room temperature, or even chilled! Serve them on a beautiful platter with a pot of tea or coffee, and watch them disappear.
Make It Your Own: Fun Variations
Once you’ve mastered the basic recipe, the flavor world is your oyster! Here are a few of my favorite twists:
- Matcha Green Tea: Sift 1-2 tablespoons of high-quality matcha powder in with the flour and cornstarch for a beautiful green hue and elegant, earthy flavor.
- Citrus Zest: Add the finely grated zest of one lemon, orange, or yuzu to the cream cheese mixture for a bright, sunny burst of flavor.
- Chocolate Swirl: Fold 2 tablespoons of cocoa powder into one-third of the finished batter. Layer the plain and chocolate batters into the liners and swirl gently with a toothpick for a marbled effect.
- Dairy-Free: Use your favorite plant-based cream cheese, butter, and milk (oat or soy work best). The texture might be slightly different, but it will still be delicious!
From My Messy Apron to Yours: Chef’s Notes
This recipe is a testament to the fact that kitchen “failures” are just discoveries in disguise. My first attempt at the full-sized cake was so comically flat we called it a “cheesecake crepe.” I learned that room temperature eggs are non-negotiable. Another time, I was too vigorous with the meringue and ended up with a delicious, but dense, cheesecake. Each little mishap taught me something valuable.
Over time, I realized the cupcake form is actually more forgiving than a large springform pan! There’s less risk of a sunken center, and the baking time is much shorter. The recipe has evolved to be my go-for-broke, never-fail version. The biggest hack of all? Don’t stress! Even if they crack or sink a bit more than you’d like, I promise you, the flavor and that incredible cottony texture will still be there. They are made with love, and that’s the most important ingredient.
Your Questions, Answered!
Q: My cupcakes collapsed a lot. What did I do wrong?
A: A slight deflation is totally normal and characteristic of cotton cheesecake! A major collapse usually happens for one of three reasons: 1) The meringue wasn’t whipped to stiff enough peaks, so it couldn’t support the structure. 2) The oven door was opened during baking, causing a temperature shock. 3) They weren’t cooled gradually in the turned-off oven. Next time, just be extra patient with whipping and cooling!
Q: Why is a water bath necessary? It seems like a hassle.
A: I know it feels like an extra step, but I promise it’s the secret weapon! The steam from the water bath creates a humid environment that cooks the cupcakes gently and evenly. This prevents the tops from drying out and cracking too quickly, which allows the cakes to rise slowly and achieve that beautiful, high rise and moist texture. Don’t skip it!
Q: Can I make these ahead of time?
A: Absolutely! In fact, I think they taste even better the next day after the flavors have had time to meld. Once completely cool, store them in an airtight container in the refrigerator for up to 3 days. Let them come to room temperature for about 30 minutes before serving for the best texture and flavor.
Q: My batter was lumpy after adding the flour. How can I avoid this?
A: The best way to avoid lumps is to sift your dry ingredients directly into the wet mixture. If you still end up with a few tiny lumps, you can pour the entire batter through a fine-mesh sieve before folding in the meringue. It’s a extra step, but it guarantees a silky-smooth batter.
Japanese Cotton Cheesecake Cupcakes
Description
If cheesecake and soufflé had a baby, this would be it—light, airy, melt-in-your-mouth, and perfectly portioned. These Japanese Cotton Cheesecake Cupcakes look elegant, taste dreamy, and jiggle with pride. Don’t be fooled by their delicate appearance; with a few key tricks, they’re surprisingly easy to pull off. Whether for afternoon tea, a party, or a quiet treat, they’ll bring joy with every bite.
Ingredients
-
125g cream cheese, softened (full-fat)
-
25g unsalted butter
-
50ml whole milk
-
3 eggs, separated (room temp)
-
60g sugar
-
30g cake flour (or AP + cornstarch swap)
-
10g cornstarch
-
½ tbsp lemon juice
-
Pinch of cream of tartar (or salt)
Optional Garnishes: powdered sugar, berries, citrus zest
Instructions
-
Preheat oven to 320°F (160°C). Line a muffin tin with 6–8 cupcake liners.
-
In a heatproof bowl over simmering water, melt cream cheese, butter & milk until smooth. Cool slightly.
-
Whisk in egg yolks. Sift in flour & cornstarch, then stir in lemon juice.
-
In a clean bowl, beat egg whites with cream of tartar until foamy. Gradually add sugar, beating to stiff peaks.
-
Gently fold meringue into yolk mixture in 3 additions until smooth and airy.
-
Spoon into liners, filling ¾ full. Place muffin tin inside a larger pan; pour hot water halfway up the sides (water bath).
-
Bake 25–30 min. Turn oven off, crack door, and let rest inside 10 min. Cool fully in tin before serving.
Notes
-
Matcha Magic: Add 1 tbsp matcha with the flour.
-
Chocolate Swirl: Fold cocoa into ⅓ of the batter and swirl.
-
Citrus Zest: Add lemon or orange zest for brightness.
-
Dairy-Free: Use plant-based cream cheese, butter & milk.
Nutritional Information*
*This is an estimate per cupcake (assuming recipe makes 7) provided for informational purposes only. I am not a nutritionist.
Calories: ~120 | Protein: 4g | Carbs: 10g | Fat: 7g
Prep Time: 15 min | Cook Time: 30 min | Cooling Time: 30 min | Servings: 6–8 cupcakes
Final Thoughts: Your Bite of Heaven Awaits
And there you have it! From a dreamy cloud of an idea to a dozen perfect little bites of joy, sitting right there on your counter. You did it!
Remember, baking this Japanese Cotton Cheesecake isn’t just about following a recipe—it’s about embracing a little patience, celebrating the gentle fold of a spatula, and trusting the magic of steam. Whether this was your first venture into jiggly desserts or your triumphant victory after a few “cheesecake pancakes,” you’ve created something truly special.


