
Spooky, Cheesy, and Oh-So-Easy: Your New Favorite Halloween Snack!
Hello, my fellow food lovers! Olivia here, welcoming you back to my cozy kitchen corner. Can you smell that? It’s the crisp, unmistakable scent of autumn in the air. The leaves are turning, sweaters are coming out of storage, and my brain is officially in full-blown festive mode. And for me, that means one thing: it’s time to start planning the most fun, food-filled Halloween celebration possible!
If you’re anything like me, you live for those moments of pure joy around the table. The kind where kids’ eyes light up, adults can’t help but smile, and everyone reaches for just one more bite. That’s the magic I want to help you create this season. We’re moving beyond the typical bowl of candy (though no hate for candy!) and diving into something warm, savory, and utterly adorable: Pumpkin-Shaped Mini Pizzas.
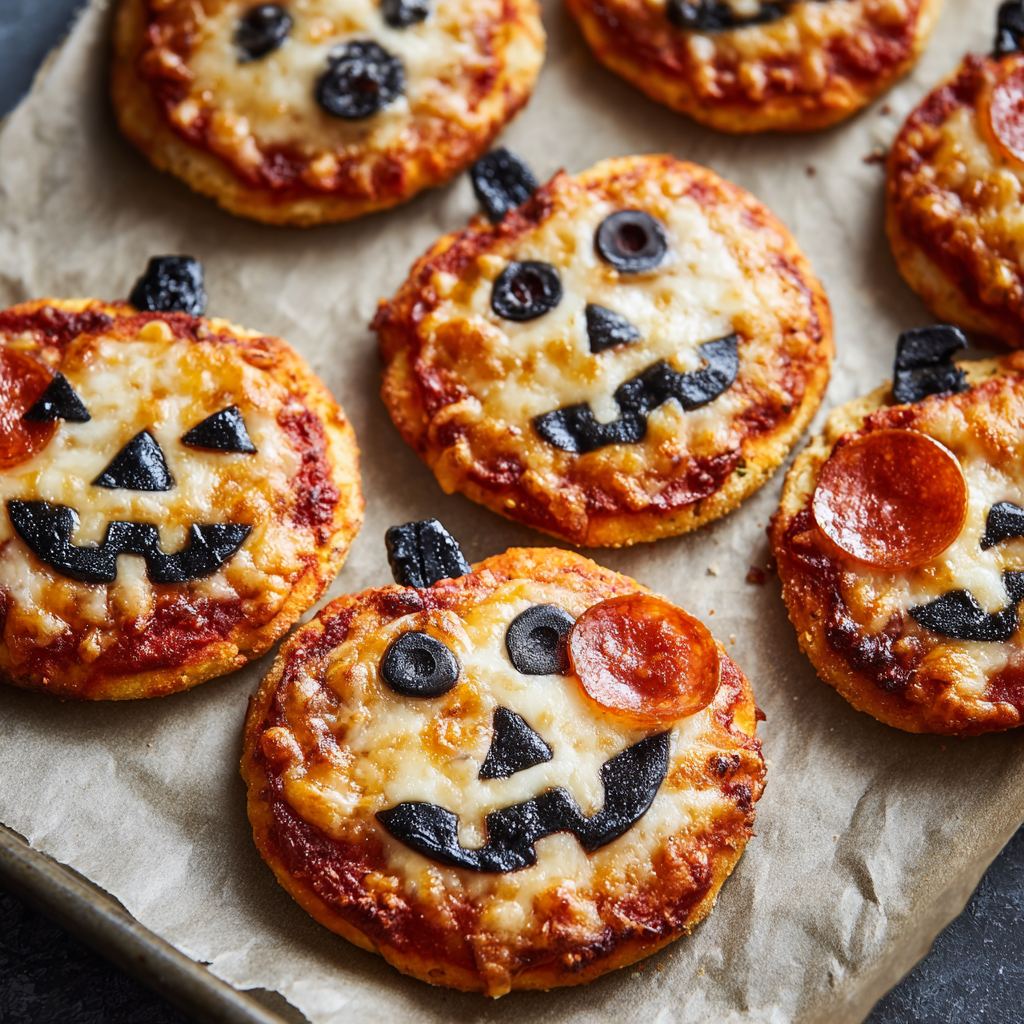
Imagine this: golden, crispy pizza dough cut into perfect little pumpkins, topped with tangy sauce and a blanket of melted mozzarella. Each one is lovingly decorated with a silly or spooky jack-o’-lantern face, making them the absolute star of any Halloween spread. They’re the perfect project to do with little helpers, a guaranteed hit at any party, and so simple that you’ll wonder why you haven’t been making them every October. So, tie on your favorite apron—the messy one with all the character—and let’s make some edible magic together!
A Slice of Halloween Tradition
This recipe didn’t just pop into my head one day. It was born out of a minor kitchen disaster that turned into one of our most cherished family traditions. A few years ago, I ambitiously decided to make a from-scratch, intricately carved pumpkin-shaped loaf of bread for my nephew’s Halloween party. Well, let’s just say the yeast and I did not see eye-to-eye that day. What emerged from the oven was… well, let’s call it ‘abstract.’
With party guests arriving in an hour, I was in a panic. I stared at the sad, deflated blob on my counter and then at a leftover sheet of pizza dough in my fridge. In a moment of pure, desperate inspiration, I grabbed a pumpkin cookie cutter and got to work. Twenty minutes later, I had a platter of hot, cheesy, grinning mini pizzas. The kids devoured them instantly. They weren’t just food; they were an activity, a conversation starter, and the undisputed hit of the party. My fancy failed bread was completely forgotten. Now, we make them together every single year. It’s our little ritual that kicks off the spooky season, a reminder that sometimes the simplest, most heartfelt ideas are the ones that create the best memories.
Gathering Your Pumpkin Pizza Patch
The beauty of this recipe is in its simplicity. You likely have most of these ingredients in your kitchen right now! Here’s what you’ll need to bring your pumpkin patch to life:
- 1 sheet pizza dough (store-bought or homemade): This is your canvas! I always keep a store-bought ball of dough in the fridge for emergency pizza nights—it’s a total lifesaver. If you’re feeling ambitious, my easy no-knead pizza dough is fantastic. Chef’s Insight: Let the dough sit at room temperature for at least 30 minutes before rolling. This makes it much easier to work with and prevents it from snapping back like a rubber band.
- 1/2 cup pizza sauce: Use your favorite jarred brand or whip up a quick homemade version. Substitution Tip: No pizza sauce? A little marinara, pesto, or even a smear of garlic-infused olive oil would work beautifully for a white pizza base!
- 1 cup shredded mozzarella cheese: The classic choice for that perfect, stretchy melt. Chef’s Insight: For the best melt and browning, shred your own cheese from a block! Pre-shredded cheese is coated with anti-caking agents that can make it a bit grainy when melted.
- Pepperoni slices or black olives, for decorating: This is where the personality comes in! Pepperoni makes great classic faces, while black olives are perfect for a vegetarian option. Get creative with other toppings like thin slices of bell pepper or jalapeño for different expressions!
- Flour, for dusting: Just a light sprinkle to keep your dough from sticking to the counter and rolling pin.
- Olive oil, for brushing: A quick brush on the crust edges before baking gives them a gorgeous, golden-brown, crispy finish that elevates these from cute to chef-level delicious.
Creating Your Edible Jack-O’-Lanterns: A Step-by-Step Guide
Ready to get your hands a little dusty with flour? Let’s do this! I’ll walk you through each step with all my favorite tips and hacks to ensure your pumpkin pizzas are absolutely perfect.
- Preheat and Prep: First things first, preheat your oven to 400°F (200°C). This is crucial for getting a nice, crispy base. While it’s heating, line a baking sheet with parchment paper. Chef’s Hack: If you don’t have parchment, a light mist of cooking spray will work, but parchment is the MVP for no-stick cleaning and perfectly browned bottoms.
- Roll It Out: On a lightly floured surface, roll out your pizza dough to about 1/4 inch thick. Don’t worry about making a perfect circle or rectangle—we’re cutting it into shapes, so just aim for a relatively even thickness so everything bakes at the same rate.
- Cut Your Pumpkins: Here’s the fun part! Dip your pumpkin-shaped cookie cutter in a little flour to prevent sticking, then press firmly into the dough. Gently transfer each pumpkin shape to your prepared baking sheet, leaving a little space between them so they have room to puff up slightly. Chef’s Tip: Re-roll your dough scraps to get as many pumpkins as possible! The second batch might be a little tougher, but they’ll still taste delicious.
- Sauce and Cheese: Now, for the foundation of flavor. Spoon a little sauce onto the center of each pumpkin shape and use the back of the spoon to spread it out, leaving a small border around the edge for the crust. Then, sprinkle a generous amount of cheese over the sauce. Chef’s Hack: Don’t over-sauce! A thin, even layer is all you need. Too much sauce will make the dough soggy and cause the cheese to slide off.
- Make Them Smile (or Scream!): This is the step where your mini pizzas get their character! Use kitchen shears or a small knife to cut your pepperoni or olives into tiny triangles and slivers for the eyes, noses, and mouths. Get the whole family involved—let everyone design their own funny or frightening face! Press the decorations gently into the cheese so they don’t fall off during baking.
- The Golden Touch: Using a pastry brush (or your fingers, no judgment here!), lightly brush the exposed crust edges with olive oil. This simple step is a game-changer—it promotes browning and gives the crust a wonderful flavor and texture.
- Bake to Perfection: Pop your baking sheet into the preheated oven and bake for 10–12 minutes. You’re looking for bubbly, lightly spotted cheese and golden-brown edges. Keep a close eye on them after the 10-minute mark, as all ovens vary. That cheesy, savory smell will tell you when they’re close!
How to Serve Your Spooky Masterpieces
Presentation is part of the fun! Let these little guys be the center of attention. Arrange your warm Pumpkin-Shaped Mini Pizzas on a large wooden board or a festive platter. Scatter a few autumn leaves (clean, artificial ones, of course!) or Halloween candy around them for a themed spread. I love serving them right out of the oven when the cheese is gloriously stretchy. Pair them with a simple green salad dressed with a sharp vinaigrette to cut through the richness, and you have a complete, crowd-pleasing meal that’s as fun to look at as it is to eat!
Mix It Up! Creative Twists on the Classic
Once you’ve mastered the basic recipe, the pumpkin-shaped canvas is yours to play with! Here are a few of my favorite variations:
- BBQ Chicken Pumpkin: Swap the pizza sauce for your favorite BBQ sauce. Top with shredded cooked chicken, red onion slices, mozzarella, and a sprinkle of fresh cilantro after baking.
- Veggie Lover’s Patch: Use a garlic-herb olive oil base. Top with a mix of sautéed mushrooms, bell peppers, and red onions before adding the cheese.
- Spicy Sausage & Pepper: Brown some Italian sausage with sliced jalapeños or bell peppers. A perfect combo for those who like a little heat with their treat!
- Everything Bagel Pumpkin: For a brunch twist, brush the dough with olive oil and skip the sauce. Top with a sprinkle of everything bagel seasoning, cheeses like mozzarella and cheddar, and bake. Top with a tiny dollop of cream cheese after baking!
- Gluten-Free Ghouls: Use your favorite gluten-free pizza dough mix or pre-made crust. The method remains exactly the same!
Olivia’s Chef Notes & Kitchen Stories
This recipe has evolved so much since that first frantic party. We’ve had pumpkins with lopsided smiles, cross-eyed pumpkins, and even one year where my nephew insisted on making a pizza with *every single topping* on it, creating a monstrous, yet delicious, pumpkin mess. And that’s the point! It’s not about perfection.
My biggest piece of advice? Lean into the chaos. Let the kids put five eyes on a pizza. Make a silly face. Laugh when the cheese bubbles over in a weird way. The slight imperfections are what make them charming and homemade. These pizzas are about the experience just as much as they are about the final product. They’re a reminder to not take cooking so seriously all the time and to find the joy in creating something that makes people happy. Now, go make a mess and have a blast doing it!
Your Questions, Answered!
Q: My dough keeps shrinking back when I try to roll it. What am I doing wrong?
A: This is almost always because the dough is too cold! Gluten, the protein in the dough, is very elastic. When it’s cold, it contracts. Make sure your dough has had a good 30-45 minutes to come to room temperature. If it’s still being stubborn, roll it out, let it rest for 5 minutes, and then roll it again—the gluten will have relaxed.
Q: Can I make these ahead of time for a party?
A: Absolutely! You can assemble the pizzas completely (up to the baking step) a few hours ahead. Cover the baking sheet tightly with plastic wrap and keep them in the fridge until you’re ready to bake. You might need to add a minute or two to the baking time since they’ll be going into the oven cold.
Q: My decorations sank into the cheese while baking. How can I prevent that?
A: This is a common one! The cheese melts and the lightweight toppings can disappear. The trick is to press them in *firmly* so they’re anchored. For heavier toppings like big pepperoni slices, they tend to hold up better. You can also try adding some decorations halfway through the baking time.
Q: I don’t have a pumpkin cookie cutter. What can I use instead?
A: No problem! A round biscuit cutter works perfectly—you can just use a small knife to carve a little pumpkin stem shape at the top after you cut the circle. You could also use ghost, bat, or cat-shaped cutters for a whole Halloween assortment!
Pumpkin-Shaped Mini Pizzas
- Total Time: 30 minutes
Description
Mini pizzas shaped like pumpkins, topped with gooey cheese and decorated as jack-o’-lanterns. Fun for kids, parties, or a festive family snack!
Ingredients
Ingredients (makes ~8–10 pumpkins)
-
1 sheet pizza dough (store-bought or homemade), at room temp
-
½ cup pizza sauce (or marinara/pesto for variation)
-
1 cup shredded mozzarella cheese (or block-shredded for best melt)
-
Pepperoni slices, black olives, or other toppings for faces
-
Light dusting of flour (for rolling)
-
Olive oil (for brushing crust)
Instructions
1. Preheat and Prep
-
Preheat oven to 400°F (200°C).
-
Line a baking sheet with parchment paper.
2. Roll Out Dough
-
On a lightly floured surface, roll dough to about ¼-inch thick.
-
Don’t worry about perfect circles—just aim for even thickness.
3. Cut Pumpkin Shapes
-
Use a pumpkin-shaped cookie cutter (lightly floured) to cut shapes.
-
Transfer to prepared baking sheet, leaving space between shapes.
-
Re-roll scraps to make additional pumpkins.
4. Add Sauce & Cheese
-
Spread a thin layer of pizza sauce on each pumpkin, leaving a small border.
-
Sprinkle mozzarella evenly over the sauce.
5. Decorate Faces
-
Use pepperoni, olives, or other toppings to create jack-o’-lantern faces.
-
Press decorations gently into cheese to keep them from sliding off.
6. Brush Crust
-
Lightly brush exposed crust edges with olive oil for golden, crispy finish.
7. Bake
-
Bake 10–12 minutes until cheese is bubbly and edges are golden brown.
-
Keep an eye on them after 10 minutes—cheese melts quickly!
Notes
-
Serve warm right from the oven for gooey, stretchy cheese.
-
Arrange on a platter with autumn decorations for a festive display.
-
Pair with a simple salad to balance richness.
- Prep Time: 15 min
- Cook Time: 15 min
Quick Nutrition Note
While these are a fun treat, it’s always good to know what you’re enjoying! The estimated nutrition per mini pizza (assuming you get 10 from the batch) is approximately: 120 calories | 6g fat | 12g carbs | 5g protein. Remember, this can vary based on the specific ingredients and brands you use.
Final Thoughts: A Recipe for Memories
And there you have it! From a kitchen mishap to a beloved tradition, these Pumpkin-Shaped Mini Pizzas are more than just a snack—they’re a ticket to a happier, sillier, and more delicious Halloween.
So, this season, I encourage you to embrace the simple joy of creating something fun. Don’t stress over perfection. Celebrate the lopsided grin, the pizza with ten eyes, and the cheese that bubbled over in just the right way. Those “imperfections” are where the real magic lives. They become the stories you’ll tell next year.


