

Dessert for Breakfast? Yes, Please! My Roasted Cherry Yogurt Bowl
Hey there, friend! Come on in, grab an apron, and let’s get cozy. Is there anything better than the smell of something sweet and fruity warming in the oven? It’s the kind of smell that feels like a hug, the kind that pulls everyone into the kitchen with curious, hungry smiles. If you’re like me, you’re always on the hunt for that magical recipe that feels like a total treat but is secretly nourishing you from the inside out. Well, my friend, you’ve just found it.
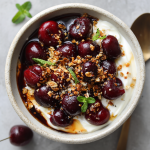
Today, we’re making my absolute favorite thing to eat pretty much any time of day: a Roasted Cherry Yogurt Bowl. This isn’t just a scoop of yogurt with some fruit tossed on top. Oh no. This is an experience. We’re taking plump, juicy cherries and roasting them until they practically burst, creating a warm, syrupy, intensely flavorful topping that melts into cool, creamy Greek yogurt. A drizzle of honey, a crunch of granola… it’s pure, unadulterated bliss in a bowl.
It’s the perfect answer to that “I want something special but I don’t want to spend an hour making it” feeling. It’s elegant enough for a weekend brunch with your besties, simple enough for a quick Tuesday morning breakfast, and light enough for a genuinely satisfying dessert. This recipe is all about celebrating simple, beautiful ingredients and turning them into something unforgettable. So, let’s preheat that oven and create a little magic together!
A Bowl of Summer Memories
This recipe always takes me right back to my grandma’s house in July. Her backyard had this massive, ancient cherry tree, and every summer, it would become our mission to beat the birds to the prize. My brother and I would be tasked with climbing the knotted branches, our small hands staining red as we filled up buckets, always eating far more than we saved.
My grandma, a no-nonsake woman who believed in wasting nothing, would turn our haul into pies, jams, and her famous “stewed cherries,” which she’d spoon over vanilla ice cream. That transformation of tart, fresh fruit into something deep, sweet, and luxurious fascinated me. This yogurt bowl is my little homage to her and those sticky-sweet summers. It’s my modern, slightly healthier take on her dessert—swapping ice cream for protein-packed yogurt, but keeping all that warm, nostalgic flavor. It’s a taste of my childhood, and now, I get to share it with you.
Gathering Your Simple, Star Ingredients
The beauty of this dish is in its simplicity. Each ingredient plays a crucial role, and I love knowing exactly what’s going into my food. Here’s what you’ll need for two generous bowls:
- 1 cup plain or vanilla Greek yogurt: I almost always use full-fat Greek yogurt here. It’s incredibly creamy, satiating, and its tangy flavor is the perfect counterpoint to the sweet cherries. The fat content means it won’t get watery when the warm cherries hit it. If you’re using vanilla, just check that it’s sweetened to your liking, as you’ll be adding more sweetness later! Chef’s Insight: For a dairy-free option, a thick coconut yogurt works wonders.
- 1 cup fresh or frozen cherries, pitted: Please, please do not skip pitting them! A cherry pitter is a fun little kitchen gadget, but if you don’t have one, carefully use a chopstick or a pastry tip to push the pit out through the stem end. Frozen cherries are a fantastic year-round option—no need to thaw them first! Substitution Tip: No cherries? This method works beautifully with frozen mixed berries, peaches, or plums!
- 1 tsp olive oil or melted coconut oil: A tiny bit of fat helps the cherries caramelize beautifully in the oven instead of just steaming. I love the fruity note a good extra virgin olive oil adds, but coconut oil is a more neutral choice if you prefer.
- 1 tsp maple syrup or honey (plus more for drizzling): We’re just using a touch to encourage the cherries to release their juices and get syrupy. I adore the rich flavor of maple syrup with the cherries, but honey is a classic choice. You’ll drizzle more on at the end, so don’t go overboard here!
- ¼ tsp vanilla extract: This is our flavor enhancer! Vanilla and cherries are a match made in heaven. It deepens the entire flavor profile and makes the whole kitchen smell incredible. Chef’s Hack: If you have it, a tiny drop of almond extract (⅛ tsp) added to the vanilla is a GAME CHANGER.
- Pinch of salt: Never, ever forget the salt! It might seem odd in a sweet dish, but it’s the secret weapon that makes all the other flavors pop and balances the sweetness perfectly.
- 2 tbsp granola or chopped almonds: This is for that essential CRUNCH factor! It provides textural contrast and makes the bowl feel complete. I love a simple, nutty granola, but raw almonds, walnuts, or even pecans are fantastic.
- Optional toppings: dark chocolate shavings, chia seeds, or fresh mint: This is where you make it your own! A few dark chocolate shavings melt into the warm cherries for a decadent touch. A sprinkle of chia seeds adds omega-3s and a fun texture. A leaf of fresh mint adds a burst of color and freshness.
Let’s Make Some Magic: Step-by-Step
Ready? This comes together so quickly. Let’s walk through it together, step by step. I’ll be right here with my chef’s tips to make sure your bowl is absolutely perfect.
- Preheat and Prep: First things first, preheat your oven to 400°F (200°C). This is the perfect temperature to get our cherries nicely roasted without burning them. While it’s heating up, pit your cherries if you’re using fresh ones. Chef’s Hack: To avoid red splatters everywhere, pit your cherries inside a large bowl! It contains the mess and saves your countertops.
- The Flavor Toss: In a medium bowl, combine your pitted cherries, oil, that 1 tsp of maple syrup (or honey), vanilla extract, and that all-important pinch of salt. Gently toss everything together until the cherries are evenly coated. You’ll already start to see a little juice forming at the bottom of the bowl—that’s the good stuff!
- Roast to Perfection: Spread the cherry mixture in a single layer on a parchment-lined baking sheet. Lining the pan isn’t just for easy cleanup; it also prevents the sugary syrup from sticking and burning onto your pan. Pop them into the preheated oven for 12-15 minutes. You’re looking for the cherries to be soft, juicy, and the juices in the pan to be bubbling and slightly thickened. Your kitchen will smell absolutely divine.
- Build Your Bowl: While the cherries are roasting, divide your Greek yogurt evenly between two bowls. Smooth it out into a nice, creamy base. Chef’s Tip: For an extra touch of luxury, you can give the yogurt a quick whip with a spoon or small whisk to make it even fluffier before plating.
- The Grand Finale: Once the cherries are out of the oven, immediately spoon them over your waiting yogurt. Don’t forget to scrape every last bit of that delicious, syrupy juice from the pan—that’s liquid gold! Now, drizzle with a little more maple syrup or honey, sprinkle generously with your chosen crunchy granola or nuts, and add any optional toppings. The contrast between the warm cherries and the cool yogurt is what makes this dish truly special.
- Serve Immediately! This isn’t a make-ahead situation. Dig in right away to experience the wonderful play of temperatures and textures. Enjoy every single spoonful!
How to Serve Your Masterpiece
Presentation is part of the fun! I love using wide, shallow bowls for this so you can see all the beautiful layers. Spoon the cool yogurt in first, creating a well in the center. Artfully pile the warm, glistening cherries right in the middle, letting some of them spill over the sides. Drizzle the honey or maple syrup in a zig-zag pattern over everything, and then sprinkle the crunchy topping over one section, so it stays crisp. If you’re using mint, place a perfect little leaf right on top. It’s a restaurant-worthy dish made in your own kitchen in minutes!
Make It Your Own: Delicious Variations
The best recipes are templates for creativity! Here are a few of my favorite ways to mix it up:
- Chocolate-Hazelnut Dream: Use hazelnuts for the crunch and add dark chocolate shavings. A tiny drizzle of melted Nutella over the top? Yes, absolutely.
- Tropical Twist: Swap the cherries for diced mango and pineapple. Use coconut oil and coconut yogurt, and top with toasted coconut flakes and macadamia nuts.
- Apple Pie Bowl: In the fall, use diced apples and a pinch of cinnamon instead of cherries. So cozy!
- Savory & Sweet: Add a sprinkle of flaky sea salt (like Maldon) and black pepper over the top right before serving. It sounds wild, but it heightens the cherry flavor incredibly.
- Protein Power-Up: Stir a scoop of vanilla or unflavored collagen peptides or protein powder into the yogurt before assembling to make it a more substantial post-workout meal.
From My Kitchen to Yours: Chef’s Notes
This recipe has been a staple in my kitchen for years, and it’s evolved in so many little ways. I remember the first time I made it, I completely forgot the salt and spent the whole time wondering why it tasted a little… flat. Never again! That tiny pinch is now non-negotiable.
I also have a funny story about the time I decided to “multitask” and answer emails while the cherries were roasting. I got so engrossed that I completely forgot about them until the smoke alarm offered a very loud, very embarrassing reminder. Let’s just say I learned that cherries go from perfectly roasted to charcoal briquettes in about 90 seconds. Set a timer, my friends! It’s a lesson in being present, even for the simplest of tasks. Now, I use that 15 minutes to sip my coffee and just breathe. It’s become a little moment of mindfulness in my day, all thanks to this humble bowl.
Your Questions, Answered!
Q: Can I make this ahead of time?
A: You can prep the components! Roast the cherries and let them cool completely, then store them in an airtight container in the fridge for up to 3 days. The yogurt can be portioned out. When you’re ready to eat, you can enjoy it cold (it’s still delicious!) or gently reheat the cherries for a few seconds in the microwave before assembling. I don’t recommend assembling the entire bowl ahead of time, as the granola will get soggy.
Q: My cherry syrup is very watery after roasting. What happened?
A> No worries! This usually happens if the cherries were particularly juicy or frozen. Simply transfer the cherries and all the juices from the pan into a small saucepan. Simmer on the stovetop over medium heat for 2-4 minutes, stirring often, until the juices reduce and thicken into a syrup. Let it cool for a minute before adding it to the yogurt.
Q: Is there a way to make this less sweet?
A> Absolutely. This is your bowl! You can easily omit the maple syrup/honey from the roasting step. The cherries will still release their natural sugars and caramelize. Then, at the end, you can control the drizzle—use just a tiny bit, or none at all. The natural sweetness of the roasted fruit is often enough.
Q: Can I use regular yogurt instead of Greek?
A> You can, but be aware that regular yogurt is much thinner. To avoid a soupy bowl, I’d recommend straining it first. Place it in a fine-mesh strainer or a coffee filter set over a bowl in the fridge for an hour or two to let some of the whey drain out. This will give you a thicker, creamier result closer to Greek yogurt.
Roasted Cherry Yogurt Bowl
- Total Time: 10 minutes
Description
Roasted Cherry Yogurt Bowl – Dessert for Breakfast!
Sweet, warm roasted cherries meet cool, creamy Greek yogurt for a cozy, nourishing breakfast (or dessert).
Ingredients
-
1 cup Greek yogurt (plain or vanilla; full-fat recommended)
-
1 cup fresh or frozen cherries, pitted
-
1 tsp olive oil or melted coconut oil
-
1 tsp maple syrup or honey (plus extra for drizzling)
-
¼ tsp vanilla extract
-
Pinch of salt
-
2 tbsp granola or chopped almonds
Optional toppings: dark chocolate shavings, chia seeds, fresh mint
Instructions
-
Preheat Oven: 400°F (200°C).
-
Prep Cherries: Pit cherries if fresh. In a bowl, toss cherries with oil, maple syrup (or honey), vanilla, and salt.
-
Roast: Spread in a single layer on a parchment-lined baking sheet. Roast 12–15 min until soft, juicy, and syrupy.
-
Prepare Yogurt: Divide yogurt into two bowls. Whip lightly for extra fluff, if desired.
-
Assemble: Spoon warm cherries (and syrup) over yogurt. Drizzle extra maple syrup or honey. Sprinkle granola/nuts and optional toppings.
-
Serve Immediately: Enjoy the contrast of warm cherries and cool yogurt.
Notes
-
Make Ahead: Roast cherries up to 3 days in advance; store in the fridge. Reheat gently before serving.
-
Too Watery? Simmer juices in a small pan 2–4 min to thicken.
-
Less Sweet: Omit syrup/honey in roasting step; drizzle lightly at the end.
-
Regular Yogurt: Strain to thicken for best texture.
- Prep Time: 10 min
Nutrition
- Calories: 270 kcal cal Per Serving
- Sugar: 18 g
- Fat: 12 g
- Carbohydrates: 24 g
- Protein: 13 g
Nourishment You Can Feel Good About
This isn’t just a tasty treat; it’s packed with goodness! Based on the core ingredients (using full-fat Greek yogurt, olive oil, maple syrup, and almonds), each bowl provides approximately*:
- Calories: ~270
- Protein: 13g (Great for keeping you full!)
- Carbohydrates: 24g
- Fat: 12g (Mostly healthy, unsaturated fats)
- Sugar: 18g (Mostly natural sugars from the fruit and a touch of maple syrup)
*Nutritional information is an estimate and will vary based on specific ingredients and brands used.
Final Thoughts: A Recipe for Joy
This Roasted Cherry Yogurt Bowl is more than just a recipe; it’s a reminder that the most joyful eating often comes from the simplest combinations. It’s proof that you don’t have to choose between what tastes indulgent and what makes you feel truly nourished. You can have both.
It’s a celebration of slowing down, even if just for the fifteen minutes it takes those cherries to roast. It’s about transforming a handful of basic ingredients into a moment of pure, warm, syrupy delight. Whether it becomes your new quiet morning ritual, your go-to brunch showstopper, or your favorite light dessert, I hope this bowl brings you as much happiness as it brings me.


