

Spooky Sweets & Kitchen Feats: Let’s Make Halloween Pinwheel Cookies!
Hey there, fellow flavor adventurer! Olivia here, your apron-clad guide to all things deliciously cozy. Can you smell it? That crisp autumn air tinged with woodsmoke, pumpkin spice, and… possibility? Halloween’s creeping closer, and my kitchen’s buzzing with excitement! Forget store-bought treats – this year, we’re conjuring magic with our Halloween Pinwheel Cookies. Imagine buttery, tender swirls in wicked shades of orange, deep purple, and inky black, looking like mini edible galaxies or spooky lollipops. They’re playful, surprisingly simple (no fancy pastry degree needed!), and guaranteed to make your treat tray the star of the haunting season. Whether you’re hosting a monster mash, packing lunchbox surprises, or just craving a festive baking session, these cookies are pure, unadulterated joy. Grab your favorite mug of cider, put on that slightly flour-dusted playlist, and let’s roll up our sleeves – literally! We’re about to make memories (and some seriously cute cookies) together.
Ghosts of Baking Past: A Pinwheel Memory
These swirly wonders always whisk me back to my very first “grown-up” Halloween party I hosted. Picture me, maybe 14, desperately wanting to impress my friends with something beyond candy corn. My grandma, sensing my baking ambition (and potential kitchen disaster), swooped in with her trusty pinwheel cookie recipe. “Liv,” she whispered conspiratorially, “the secret’s in the chill and the thrill of the swirl!” We turned her kitchen into a mad scientist’s lab, giggling as we kneaded vibrant doughs, our fingers stained purple and orange. I remember the sheer panic when my first log cracked while rolling – Grandma just chuckled, patched it with spare dough, and declared it a “spooky seam.” When those first perfectly swirled cookies emerged from the oven, we did a ridiculous victory dance. The party was a hit, but the real magic was that messy, laughter-filled afternoon with Grandma, where flour flew and confidence soared. Baking these now? It’s like wrapping myself in a warm, slightly sugary, ghostly hug. Every swirl carries that memory.
Gathering Our Ghoulish Goods
Ready to raid the pantry? Here’s your spellbook list! Using simple ingredients makes the vibrant colors really pop. Remember, quality matters for flavor, especially that butter!
- 1 cup (225g) unsalted butter, softened – This is our cookie’s soul! Unsalted lets us control the salt. Chef Insight: “Softened” means it yields gently to a finger press – not melted! Cold butter won’t cream properly, melted butter makes greasy cookies. If you forget to soften it? Grate cold butter on a box grater – it works wonders! Vegan? Swap in a high-quality plant-based butter stick (like Miyoko’s or Earth Balance Buttery Sticks) that works for baking.
- 1 cup (200g) granulated sugar – Sweetness and structure. Sub Tip: For a slightly deeper flavor, use 1/2 cup white + 1/2 cup light brown sugar, packed. It adds a hint of caramel warmth.
- 1 large egg – Our binder, bringing everything together. Room temp is best! Chef Hack: Forgot to take it out? Place the whole egg (in its shell!) in a bowl of warm water for 5-10 minutes.
- 1½ tsp vanilla extract – Pure magic for flavor depth. Don’t skimp! Flavor Twist: Add 1/4 tsp almond extract for a subtle, sophisticated background note.
- 2½ cups (315g) all-purpose flour – The backbone. Chef Must: Weigh it if possible! Scooping packs flour down, leading to dry cookies. Fluff your flour, spoon it into the cup, then level. Gluten-free? A 1:1 GF blend like King Arthur Measure for Measure works beautifully here.
- ½ tsp baking powder – Lifts our cookies just a touch for perfect tenderness.
- ¼ tsp salt – Balances the sweetness and enhances all flavors. Crucial!
- Gel food coloring: Orange, Black, Purple – NON-NEGOTIABLE TIP: Use GEL, not liquid! Gel is concentrated, gives vibrant hues without adding liquid that alters dough texture. Americolor or Wilton are great brands. Black Hack: Black gel can be stubborn. Start with a deep purple base (mix red + blue), then add black gel – you’ll use less and get a richer shade.
- Optional: Halloween sprinkles for edges – Adds crunch and instant festive flair! Use jimmies or nonpareils. Chef Fun: Match the sprinkle color to the dough edge for extra pop!
The Spooky Swirl Saga: Let’s Bake!
Okay, team! Time to transform these simple ingredients into edible art. Don’t fear the swirl – I’ll guide you through every step with my favorite kitchen hacks. Active voice engaged!
- Cream Butter & Sugar Like a Boss: Grab your stand mixer (or trusty hand mixer) and beat that softened butter and granulated sugar on medium-high speed. We’re not just mixing – we’re CREAMING! Beat for a solid 3-5 minutes until the mixture is incredibly pale, fluffy, and almost looks like whipped frosting. Why? This incorporates air, which is key for a light, tender cookie texture. Scrape down the bowl halfway! Add the room-temp egg and vanilla extract. Mix on medium just until fully combined – about 1 minute. Don’t overbeat after adding the egg.
- Whisk & Combine Dry Ingredients Gently: In a separate bowl, whisk together the flour, baking powder, and salt. Chef Secret: Whisking = instant sifting and even distribution! Turn your mixer to low speed. Gradually add the dry ingredients to the wet mix in about 3 additions. Mix ONLY until the flour disappears and a soft dough forms. Overmixing = Tough Cookies! The dough should pull away from the sides but still feel slightly soft. If it seems too sticky, add 1 tbsp flour at a time, but be cautious.
- Divide & Conquer with Color: Turn the dough out onto a clean surface (no flour needed yet!). Divide it evenly into three portions. Now, the fun part! Add gel food coloring to each portion. Start with a small drop (gel is potent!), knead it in with clean hands until evenly colored. Add more gel as needed for your desired spooky vibes. Hot Tip: Wear disposable gloves unless you want Halloween hands for days! Work quickly so the dough doesn’t warm up too much.
- Roll, Stack & Roll Again (The Pinwheel Magic!): This is where the wow factor happens! Take one colored dough portion and place it between two large sheets of parchment paper. Roll it out into a rectangle roughly 9×7 inches and about 1/4-inch thick. Repeat with the other two colors. Hack Attack: Use ruler guides or lightly mark the parchment to help shape the rectangle. Peel off the top parchment sheets. Now, carefully stack your colored rectangles on top of each other. Which order? Totally your spooky call! (Orange/Black/Purple? Purple/Orange/Black? Go wild!). Gently press the layers together at the edges. Starting from one long edge, use the bottom parchment to slowly and tightly roll the stacked dough into a log, like a jelly roll. Don’t stress small cracks – we’ll fix them!
- Wrap & Chill (Patience, Padawan!): Wrap your beautiful dough log snugly in plastic wrap. Chef’s Crucial Step: Refrigerate for AT LEAST 1 hour, or up to 2 days. Why? This firms the butter, making slicing clean swirls possible. It also relaxes the gluten, preventing misshapen cookies. Seriously, don’t skip the chill! Overnight is fantastic for flavor development too.
- Slice, Sprinkle & Bake to Perfection: Preheat your oven to 350°F (175°C). Line baking sheets with parchment paper. Unwrap your chilled log. If it’s very firm, let it sit for 5 minutes for easier slicing. Using a sharp serrated knife, slice the log into 1/4-inch thick rounds. Pro Move: Wipe the knife clean between slices for the neatest edges. If you want sprinkles, pour them onto a plate. Gently press the edge of each cookie slice into the sprinkles. Place cookies about 2 inches apart on prepared sheets. Bake for 10-12 minutes. Watch Closely! They’re done when the edges look *just* set and the centers appear slightly soft – they’ll firm up as they cool. Don’t overbake for soft cookies!
- Cool & Conjure: Let the cookies cool on the baking sheet for 5 minutes. This lets them set. Then, transfer them carefully with a spatula to a wire rack to cool completely. Resist the urge to eat warm! They need to firm up fully for the perfect texture and clean swirls. Your patience will be rewarded!
Plating Your Spooky Masterpieces
Presentation is part of the Halloween fun! Arrange these vibrant pinwheels on a simple black platter or a rustic wooden board for maximum contrast. Pile them high like a colorful cookie tower, or group them by color for a gradient effect. Tuck in a few fake spiders or plastic rings for extra giggles. They’re perfect stacked in cellophane bags tied with orange ribbon as spooktacular party favors, or nestled into treat boxes for trick-or-treaters who deserve something extra special. Pair them with mugs of steaming hot apple cider or a frothy pumpkin spice latte for the ultimate cozy Halloween moment. Let those swirls shine!
Spin the Spooky Wheel: Creative Twists!
Got the basic swirl down? Let’s get creative! These cookies are a fantastic canvas for flavor and flair:
- Chocolate Swirl Spectacular: Replace 1/4 cup of flour in one dough portion with 1/4 cup unsweetened cocoa powder for a decadent chocolate layer. Pair it with orange and black for a classic Halloween combo.
- Spiced Pumpkin Patch: Add 1 tsp pumpkin pie spice to the orange dough portion along with the coloring. Instant fall flavor infusion!
- Monster Mash-Up: Skip the traditional colors! Try neon green, electric blue, and hot pink for a funky monster vibe. Or go elegant with white, silver, and midnight blue.
- Gluten-Free Ghouls: Swap the all-purpose flour for a trusted 1:1 gluten-free baking blend (like King Arthur or Bob’s Red Mill). Ensure your baking powder is GF too. The texture is slightly more delicate but just as delicious!
- Citrus Zing: Add 1 tsp of finely grated lemon or orange zest to the dough along with the vanilla. Brightens the whole cookie beautifully!
Olivia’s Whispers from the Flour-Dusted Trenches
Oh, the stories these cookies could tell! My first solo batch looked more like abstract art than pinwheels – let’s just say the log was more “lump” than “log.” But practice (and that essential chill time!) makes progress. Over the years, I’ve learned the gel food coloring is non-negotiable (RIP my first purple-grey attempt with liquid dye!), and that a sharp serrated knife is the unsung hero of clean slices. I love how adaptable this recipe is – it’s become my go-to not just for Halloween, but for Christmas (red/green/white!), birthdays, and even baby showers. The biggest evolution? Embracing the imperfections! A slightly wonky swirl? Call it “ghost-touched.” A sprinkle avalanche? “Edible confetti.” Baking should be joyful, not stressful. So crank the tunes, laugh if the dough sticks, and relish the messy, magical process. These cookies aren’t just treats; they’re little edible hugs and happy kitchen memories in the making. Now go make some magic (and maybe a little mess)!
Spooky Cookie SOS: Your Questions Answered!
Ran into a ghoulish glitch? Don’t panic! Here are solutions to common pinwheel predicaments:
- Q: My dough log cracked when I tried to slice it! Help!A: Chilling is KEY! If it cracked, it likely needed more fridge time. Pop the whole log back in for another 30-60 minutes. If the cracks are small, just slice carefully – they often bake out. Big cracks? Let the log soften *slightly* (5 mins max), gently knead the cracked section to smooth it, re-roll, and re-wrap tightly before chilling again. Prevent future cracks by rolling the stacked layers tightly but gently initially, and ensuring the dough isn’t too dry (if it feels crumbly when dividing, knead in a teaspoon of milk).
- Q: My colors bled together or look muddy after baking!A: Two likely culprits: Over-kneading the colored doughs or not chilling long enough. When adding gel color, knead *just* until uniform. Overworking warms the dough and can make colors migrate. Also, insufficient chilling means the layers soften and bleed when sliced or baked. Ensure a solid 1-hour minimum chill! Using gel (not liquid) food coloring is vital for vibrant, non-bleeding hues.
- Q: The cookies spread too much and lost their swirl shape!A: Butter temperature is crucial! If your butter was too soft/melted or the dough got too warm before chilling, spreading happens. Ensure butter is softened but cool. Chill the dough log adequately (cold dough spreads less). Also, double-check your flour measurement – too little flour leads to spread. Use the spoon-and-level method or weigh it! Don’t overcrowd the baking sheet – heat circulation matters. Baking on parchment or a silicone mat helps too.
- Q: Can I freeze these cookie dough pinwheels?A: Absolutely! It’s a fantastic make-ahead trick. After forming the log and wrapping tightly in plastic wrap, you can freeze it for up to 3 months. Thaw overnight in the fridge before slicing and baking. You can also freeze the baked, cooled cookies in an airtight container for up to 2 months. Thaw at room temperature. Perfect for getting ahead of the Halloween rush!
Halloween Pinwheel Cookies
- Total Time: 1.5 hr
Description
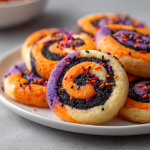
Hey, fellow flavor adventurer! These Halloween Pinwheel Cookies are buttery, tender, and swirled in vibrant orange, purple, and black shades—like mini edible galaxies or spooky lollipops. Perfect for parties, treat bags, or cozy baking sessions, they’re surprisingly simple and fun to make. Each swirl carries festive magic and a little nostalgia, making these cookies a joyful, creative Halloween staple.
Ingredients
For the Cookies:
-
1 cup (225g) unsalted butter, softened
-
1 cup (200g) granulated sugar (or ½ cup white + ½ cup light brown sugar)
-
1 large egg, room temperature
-
1½ tsp vanilla extract (optional: + ¼ tsp almond extract)
-
2½ cups (315g) all-purpose flour
-
½ tsp baking powder
-
¼ tsp salt
-
Gel food coloring: Orange, Black, Purple
-
Optional: Halloween sprinkles
Optional Flavor Twists:
-
Chocolate: Replace ¼ cup flour with cocoa powder in one portion
-
Spiced: Add 1 tsp pumpkin pie spice to orange dough
-
Citrus: Add 1 tsp grated lemon or orange zest
Instructions
-
Cream Butter & Sugar:
Beat butter and sugar on medium-high speed 3–5 min until pale and fluffy. Add egg and vanilla; mix until combined. -
Combine Dry Ingredients:
Whisk flour, baking powder, and salt. Gradually add to wet mixture on low speed, mixing just until a soft dough forms. Avoid overmixing. -
Divide & Color:
Divide dough into 3 portions. Knead gel coloring into each portion until uniform (use gloves). -
Roll, Stack & Roll Again:
Roll each color into a 9×7-inch rectangle, ¼-inch thick. Stack rectangles in desired order. Starting from a long edge, roll tightly into a log. -
Wrap & Chill:
Wrap dough log in plastic wrap. Chill 1 hour (or up to 2 days). -
Slice, Sprinkle & Bake:
Preheat oven to 350°F (175°C). Slice log into ¼-inch rounds. Press edges into sprinkles if desired. Place 2 inches apart on parchment-lined sheets. Bake 10–12 min until edges are set; centers slightly soft. -
Cool:
Cool 5 min on sheets, then transfer to a wire rack to fully firm before serving.
Notes
-
Chill: Prevents cracks and color bleeding.
-
Sharp Knife: Clean between slices for neat edges.
-
Butter Temperature: Soft but not melted; ensures minimal spread.
-
Gel Color Only: Vibrant swirls without altering dough texture.
-
Freezing: Dough logs freeze up to 3 months; baked cookies up to 2 months.
- Prep Time: 30 min
Nutrition
- Calories: 140 cal Per Serving
- Fat: 6g
- Carbohydrates: 19g
- Protein: 1g
Nutritional Bite-Sized Info (Approximate per Cookie)
Yield: ~24 cookies | Prep Time: 30 minutes + Chill Time | Bake Time: 10-12 minutes | Total Time: ~1.5 hours
Calories: ~140 | Fat: 6g | Carbohydrates: 19g | Protein: 1g
(Note: Nutritional info is an estimate based on ingredients used and can vary significantly with substitutions, especially sprinkles.)
Final Thoughts: Why These Cookies Cast a Delicious Spell
Halloween Pinwheel Cookies are more than a treat—they’re a celebration of creativity, nostalgia, and kitchen science. From their historical roots to their foolproof adaptability (gluten-free? vegan? no problem!), these cookies invite bakers of all levels to play with color and flavor. Whether you’re recreating Olivia’s cherished grandma memories or starting new traditions, their whimsical swirls capture the joy of the season. So preheat that oven, embrace the messy fun, and remember: even “imperfect” pinwheels taste spooktacular. Happy haunting—and baking


