

Welcome to My Candy Corn Cookie Wonderland!
Hey there, fellow baking enthusiast! Olivia here, your apron-clad partner in crime for all things cozy and delicious. Can you smell it? That crisp autumn air mixed with melting butter and vanilla? That’s the smell of pure joy in my kitchen today. If you’re anything like me, you live for those moments when baking becomes an adventure—and these Candy Corn Cut-Out Cookies? They’re pure magic. Forget the polarizing candy aisle version; we’re turning that iconic Halloween tricolor into buttery, tender sugar cookies that’ll make everyone grin. No fancy skills needed—just your favorite playlist, maybe a pumpkin-spiced latte, and that wonderful itch to create something ridiculously fun. Whether you’re baking with kids, prepping for a fall party, or just treating yourself (you deserve it!), these cookies are your golden ticket to edible happiness. Ready to make memories (and a glorious mess)? Let’s dive in!
Why These Cookies Spark My Soul
Picture this: It’s 1998. I’m eight years old, standing on a wobbly stool in my grandma’s kitchen, flour smudged on my nose. She hands me a lump of sunshine-yellow dough and winks: “Now we paint with food, Olivia!” Together, we layered dough like edible rainbows—golden yellow, pumpkin orange, snowy white—giggling when the colors bled just a little. She’d tell stories of her childhood Halloweens while we sliced triangles, transforming simple dough into candy corn treasures. Those cookies weren’t perfect. Some looked more like lopsided pyramids than candy corn, but they tasted like pure love. Grandma’s been gone 15 years now, but every time I layer these cookies, I feel her beside me, whispering: “More glitter sugar, sweet pea!” That’s why baking’s my heartbeat—it turns flour and butter into time machines.
Your Candy Corn Toolkit
Gather these goodies—and remember, baking’s a vibe, not a stress test!
- 1 cup (225g) unsalted butter, softened – The star! Soften it on the counter (not the microwave) for that dreamy “light and fluffy” texture. Chef hack: If you forgot to soften it? Grate cold butter with a cheese grater!
- 1 cup (200g) granulated sugar – Not just sweetener—it helps cookies spread and crisp. For deeper flavor, swap half with light brown sugar.
- 1 large egg – Your binder. Room temperature blends smoother! Cold egg? Soak it in warm water for 5 mins.
- 1½ tsp vanilla extract – Pure vanilla is worth it! For fun, try almond extract in the white layer.
- 2½ cups (315g) all-purpose flour – Spoon and level it! Packing flour = tough cookies. Gluten-free? 1:1 GF flour works great.
- ½ tsp baking powder – Our lift agent. Not baking soda—they’re different!
- ¼ tsp salt – Balances sweetness. Use flaky sea salt for a gourmet sparkle.
- Food coloring: orange and yellow – Gel-based gives vibrant color without thinning dough. Natural dyes work but mute the hues.
- Optional: white royal icing or glaze – For “candy corn” details. Melted white chocolate + coconut oil also works!
Let’s Bake Some Sunshine!
Roll up your sleeves—this is where the magic happens!
- Cream It: Beat butter and sugar in a stand mixer (or with a hand mixer) on medium-high for 3 full minutes. Chef secret: This isn’t just mixing—it’s incorporating air for that melt-in-your-mouth texture! Scrape the bowl. Add egg and vanilla; beat until silky (1 min).
- Combine Dry: Whisk flour, baking powder, and salt in a bowl. Gradually add to wet ingredients on low speed. Watch closely—mix JUST until no dry streaks remain. Overmixing = tough cookies!
- Divide & Tint: Split dough into thirds. Tint one portion bright yellow (10-12 drops gel). Tint another orange (mix red+yellow or use orange gel). Keep one plain. Pro tip: Wear gloves to avoid rainbow hands!
- Layer Dough: Line a 9×5 loaf pan with plastic wrap (let extra hang over sides). Press yellow dough evenly into the bottom. Repeat with orange, then white. Fold plastic over top. Freeze 30-45 mins. Why freeze? Solid dough = clean slices!
- Slice & Cut: Lift dough block from pan. Peel off plastic. Slice into ¼-inch slabs with a sharp knife. Use a small triangle cookie cutter (or a knife) to cut candy corn shapes. Re-roll scraps!
- Bake: Place cookies on parchment-lined sheets 1 inch apart. Bake at 350°F (175°C) for 8-10 mins—edges should stay pale. Cool 5 mins on sheets, then transfer to racks.
- Decorate (Optional): Pipe white icing “tips” on cookies once cool. Or drizzle melted white chocolate! Let set before devouring.
Sharing Is the Best Part
Pile these cuties on a rustic wooden board or a vintage cake stand—they’re almost too pretty to eat! Tie bundles with twine for neighbor gifts, or arrange them around a pumpkin centerpiece at your Halloween party. Serve with hot apple cider dusted with cinnamon, or dunk ’em in dark hot chocolate for a cozy contrast. Kids adore decorating their own with edible glitter or rainbow sprinkles! Pro tip: Add a tiny bowl of extra candy corn nearby for giggles.
Decorating & Presentation—Turning Cookies into Edible Art
A beautifully decorated cookie is a feast for the eyes before the mouth. Here’s how to make yours Instagram-worthy.
1. Icing Techniques
-
Royal Icing: Pipe a white tip for classic candy corn authenticity.
-
White Chocolate Drizzle: Melt white chocolate + 1 tsp coconut oil for a glossy finish.
-
Edible Glitter: Brush cookies with a tiny bit of corn syrup, then sprinkle gold or orange luster dust.
2. Serving Ideas
-
Halloween Charcuterie Board: Arrange cookies with chocolate-dipped strawberries (as “pumpkins”) and marshmallow ghosts.
-
Cookie Bouquet: Stick lollipop sticks into cookies and “plant” them in a foam block inside a cauldron.
-
Gift Jars: Layer cookies in a clear jar with orange and yellow tissue paper.
3. Pairing Suggestions
-
Drinks: Spiced apple cider, pumpkin lattes, or dark hot chocolate.
-
Savory Contrast: Serve with sharp cheddar cheese—sweet and salty is a winning combo!
Make ’Em Uniquely Yours!
- Chocolate Dipped: Dunk half the cookie in dark chocolate—salted caramel vibes!
- Spiced: Add 1 tsp pumpkin spice to the orange layer.
- Vegan: Use plant-based butter + flax egg (1 tbsp ground flax + 3 tbsp water).
- Citrus Zing: Add lemon zest to yellow layer, orange zest to orange layer.
- Mini Bites: Use a tiny triangle cutter for cocktail-party nibbles!
Olivia’s Cookie Confessions
Okay, real talk: my first batch looked like abstract art! The orange layer bled into the yellow, and my “triangles” were… creative. But guess what? They still tasted incredible. Over the years, I learned tricks: freeze dough longer if your kitchen’s warm, and chill cut cookies 10 mins before baking to hold shape. I once used beets for “natural” orange—they turned pink (cue zombie corn!). Now I embrace gel dyes for that nostalgic pop. These cookies evolved from grandma’s recipe to my kids’ favorite tradition—we even make “ugly” ones together. Remember: Imperfect cookies still spark joy!
Your Questions, Answered!
Q: My colors bled! How do I prevent that?
A: Ensure each dough layer is COMPACTED in the pan (press firmly!). Also, freeze the dough block longer—up to 1 hour if needed. Slightly drier dough helps too (add 1-2 tbsp flour if sticky).
Q: Cookies spread too much/lost shape?
A: Three culprits: 1) Butter was too warm—dough should be cold going into oven. 2) Over-creamed butter/sugar (stick to 3 mins max). 3) Oven too cool—use an oven thermometer! Chill cut cookies before baking.
Q: Can I make dough ahead?
A: Absolutely! Freeze the layered dough block (wrapped tight) for up to 1 month. Thaw slightly before slicing. Baked cookies freeze beautifully too—undecorated is best.
Q: Help—my dough crumbles when slicing!
A: Dough’s too cold! Let it sit 5 mins at room temp. If still crumbly, you may have added too much flour—next time, spoon-and-level!
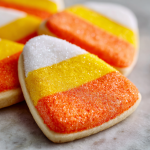
Candy Corn Cut-Out Cookies
Description
Welcome to edible nostalgia! These cookies transform the iconic Halloween candy into buttery sugar-cookie magic—layered in sunny yellow, pumpkin orange, and snowy white. Soft, tender, and ridiculously fun, they’re perfect for fall parties, cozy baking days, or gifting to neighbors. No candy corn debates here—just pure joy, one bite at a time.
Ingredients
-
1 cup (225g) unsalted butter, softened
-
1 cup (200g) sugar (swap half with light brown for depth)
-
1 large egg, room temp
-
1½ tsp vanilla extract (try almond in the white layer!)
-
2½ cups (315g) all-purpose flour (GF 1:1 works)
-
½ tsp baking powder
-
¼ tsp salt
-
Food coloring: orange + yellow gel
-
Optional: white royal icing or melted white chocolate for tips
Instructions
-
Cream It – Beat butter + sugar 3 mins until fluffy. Add egg + vanilla, beat smooth.
-
Mix Dry – Whisk flour, baking powder, salt. Add to wet, mix until just combined.
-
Divide & Tint – Split dough into 3 parts: tint one yellow, one orange, keep one plain.
-
Layer – Press yellow, then orange, then white into a plastic-lined loaf pan. Freeze 30–45 mins.
-
Slice & Cut – Lift block, slice slabs, cut into triangles (or use a small cutter).
-
Bake – Arrange on parchment, bake at 350°F (175°C) for 8–10 mins. Keep edges pale. Cool fully.
-
Decorate – Optional icing or drizzle for extra candy-corn vibes.
Notes
-
Freeze longer if layers bleed—cold dough = crisp cuts.
-
Chill cut cookies 10 mins before baking to keep shape.
-
Scrappy dough? Re-roll into marbled “tie-dye” cookies!
Nutrition
- Calories: 140 cal Per cookie
- Fat: 6g
- Carbohydrates: 20g
- Protein: 2g
Nutritional Nibbles (Per Cookie)
Calories: ~140 • Fat: 6g • Carbs: 20g • Protein: 2g
Note: Values are estimates. Icing adds extra sugar.
Final Thoughts: More Than Just a Cookie
These Candy Corn Cut-Out Cookies aren’t just a treat—they’re a celebration of tradition, creativity, and connection. Whether you’re baking with kids, honoring a family recipe, or simply indulging in seasonal joy, every bite carries a story.
So go ahead—embrace the mess, laugh at the lopsided triangles, and savor the sweetness. Because the best bakes aren’t about perfection… they’re about the memories you make along the way.


