

Spellbinding Sweetness: Your Kitchen’s Next Magic Trick!
Hey there, fellow kitchen conjurer! Olivia here, apron dusted with flour and eyes sparkling like Halloween fairy lights. Is there anything more delightfully witchy than turning simple pantry staples into edible magic? That’s exactly what we’re doing today with these Witch Hat Sugar Cookies – the kind of treat that makes kids gasp and adults sneak seconds when they think no one’s looking. Picture this: buttery sugar cookies transformed into miniature witch hats with a Hershey’s Kiss peak and a chocolate “brim” sparkling with sprinkles. They’re playful, adorable, and secretly SO easy that you’ll feel like you’ve cast a simplicity spell! Whether you’re prepping for a spooky soiree, hosting a monster-themed bake sale, or just craving a dose of whimsy with your afternoon coffee, these little hats deliver pure, unadulterated joy. Forget complicated fondant or finicky piping bags; our magic lies in clever shortcuts and the kind of messy, hands-on fun that makes baking memories. So grab your favorite mixing bowl (mine’s slightly chipped and utterly beloved), crank up those Halloween tunes, and let’s turn your kitchen into the most enchanting bakery in town. Trust me, one bite of these charming creations, and you’ll be hooked – they’re the edible equivalent of a warm, spooky hug!
Why These Hats Hold a Special Place in My Cauldron
These cookies whisk me straight back to my niece Lily’s first “real” Halloween. She was four, obsessed with all things witchy, and determined to be “Glinda the Good Witch… but with a BLACK hat, Aunt Livvy!” Trying to find a treat worthy of her grand costume debut felt monumental. Store-bought cupcakes felt too generic, and intricate cakes felt beyond my frazzled auntie abilities. Then, I stumbled on the idea for witch hat cookies – simple sugar cookie bases crowned with chocolate kisses. That first batch was… chaotic. Sprinkles ended up *everywhere* (think fairy dust explosion), melted chocolate adorned my elbows more than the cookies, and my “hat brims” looked more like chocolate puddles. But Lily? She took one look, her eyes wide as saucers, and whispered, “You made REAL magic, Aunt Livvy.” She carefully arranged them on a plastic cauldron platter, declaring them “witch fuel.” Seeing pure, unbridled wonder on her face – and the sticky chocolate grin she wore after devouring two – cemented these cookies as my forever Halloween tradition. They remind me that kitchen magic isn’t about perfection; it’s about the messy, joyful, sprinkle-covered moments that create the sweetest memories.
Gathering Your Magical Components
Here’s your spellbook shopping list! Don’t stress about exactitude – baking is an art, not alchemy (well, mostly!).
- 1 cup (225g) unsalted butter, softened – The potion’s foundation! Softened (think cool room temp, not melty) creates that dreamy, light texture. Chef’s Tip: No unsalted? Use salted butter but skip the added salt later. Vegan? Swap in a high-quality plant-based stick butter.
- 1 cup (200g) granulated sugar – Sweetness incarnate. Insight: Standard white sugar gives that classic crisp edge. For deeper flavor, try swapping half with light brown sugar!
- 1 large egg – Our binding charm. Substitution Spell: Flax egg (1 tbsp ground flax + 2.5 tbsp water, sit 5 mins) works beautifully for an egg-free cauldron.
- 1½ tsp vanilla extract – The aromatic soul. Level Up: Try almond extract for half the vanilla for a mysterious twist!
- 2½ cups (315g) all-purpose flour – The structural spell. Pro Hack: Spoon & level flour into your cup! Scooping packs it down and leads to dry cookies. Gluten-free? Use a 1:1 GF blend (like Bob’s Red Mill).
- ½ tsp baking powder – Our little lift charm.
- ¼ tsp salt – The essential flavor enhancer. Balances the sweet!
- 24 Hershey’s Kisses (unwrapped) – The iconic hat peak! Unwrap Early! Do this first to avoid frantic unwrapping mid-bake. Alternatives? Mini Reese’s Cups or Rolos for different hat styles!
- ½ cup chocolate chips (melted) – The magical “glue” and brim. Chef’s Secret: Semi-sweet is classic, but dark or milk chocolate works wonders. Melt slowly (microwave 30-sec bursts) to avoid seizing.
- Colorful sprinkles or decorative sugar – Your personality potion! Think purple & green, classic orange/black, or iridescent for fairy witch vibes.
- Optional: pre-made royal icing or candy melts for piping – For extra-detailed brims or buckles. Time-Saver: Melted chocolate in a tiny zip-top bag (snip the corner!) works perfectly too.
Conjuring Your Cookie Hats: The Magic Ritual
Ready to brew some deliciousness? Follow these steps – I’ll whisper my best kitchen secrets along the way!
- The Butter-Sugar Alchemy: Grab your trusty mixer (or strong arm and whisk!). Cream the softened butter and granulated sugar together on medium speed for a solid 3-4 minutes. Why this matters? We’re not just mixing; we’re incorporating air! This makes the cookies beautifully light, not dense. You want it pale and fluffy – like sweet witchy clouds! Tip: Scrape down the bowl halfway through to ensure no butter lumps are hiding.
- Egg & Essence Infusion: Beat in the egg and vanilla extract until just combined. Watch closely: Over-beating here can make cookies tough. A smooth, slightly glossy mixture is the goal. Hack: Crack the egg into a small bowl first! Saves you from fishing out shell fragments mid-magic.
- Dry Ingredient Enchantment: In a separate bowl, whisk together the flour, baking powder, and salt. Whisking = Distribution! This prevents clumps of baking powder. Gradually add the dry mix to the wet ingredients on low speed. Golden Rule: Mix ONLY until the flour disappears. Over-mixing = tough cookie witches! The dough will be soft but not sticky.
- Shaping the Hat Base: Preheat your oven to 350°F (175°C). Line baking sheets with parchment paper (lifesaver for easy cleanup!). Roll dough into smooth 1-inch balls (a small cookie scoop is my MVP here!). Place them 2 inches apart on the sheets. Gently flatten each ball just slightly with your palm or the bottom of a glass. Why flatten? This gives the kiss a stable base and prevents lopsided hats!
- Baking the Golden Discs: Bake for 10-12 minutes. Timing is Key: They’re done when the edges are set and have the faintest golden hue – the centers will still look soft. DO NOT OVERBAKE! They firm up as they cool. Pro Move: Rotate the pans halfway through for even baking. Let the cookies cool completely on the sheets. Patience, young wizard! Warm cookies make melty chocolate hats.
- Summoning the Chocolate Peak: Melt your chocolate chips carefully. Dip the flat bottom of a Hershey’s Kiss into the melted chocolate – just enough to coat it lightly. This acts as glue! Immediately press it firmly (but gently!) onto the center of a cooled cookie. Hold for a few seconds. Repeat for all cookies. Hack: Work in batches of 6-8 to keep the chocolate warm and dippable.
- Casting the Decorative Spell (The Brim!): Now, the fun part! Pour remaining melted chocolate into a small piping bag or zip-top bag. Snip a TINY hole in the corner. Pipe a circle of chocolate around the base of each Kiss, creating the hat’s brim. Go wild! Make it wavy, smooth, or jagged – imperfection adds charm! IMMEDIATELY shower with sprinkles before the chocolate sets. Tip: Place cookies on a cooling rack over parchment before piping. Catch the sprinkle fallout for reuse!
Presenting Your Edible Enchantments
These little hats practically beg for a dramatic entrance! Skip the boring plate and lean into the magic. Arrange them on a bed of crinkled black or purple tissue paper inside a cauldron (real or decorative!). For a spooky-elegant vibe, place them on a tiered cake stand draped with cobweb lace. Scatter a few plastic spiders or bats nearby for giggles. Serving at a party? Stick a miniature paper witch broomstick (find them at craft stores!) beside each cookie on a serving platter. They pair perfectly with a steaming mug of “Witch’s Brew” (hot apple cider with cinnamon sticks) or a frosty glass of chocolate milk. The key? Have fun and let their inherent whimsy shine!
Brew Up Your Own Signature Spell!
One recipe, endless magical possibilities! Here’s how to tweak your witch hats:
- Chocolate Coven: Add ¼ cup cocoa powder to the dry ingredients for chocolate sugar cookie bases. Pair with dark chocolate kisses and orange sprinkles!
- Gluten-Free & Vegan Familiars: Use a gluten-free 1:1 flour blend, plant-based butter, flax egg, and dairy-free chocolate. Ensure sprinkles are vegan-friendly!
- Fruity Witch Vibes: Swap the vanilla for orange or raspberry extract in the dough. Use matching colored sanding sugar for the brims!
- Peanut Butter Cauldron: Use a peanut butter cookie dough base. Press a mini Reese’s Cup (pointy side up!) into the center instead of a Kiss. Pipe a chocolate brim.
- Mummy Hats (Post-Halloween Twist!): Skip the brim. After attaching the kiss, pipe thin white chocolate “bandages” criss-crossing over it. Add candy eyes!
Olivia’s Cauldron Chronicles & Wisdom
Oh, the tales these cookies could tell! That first year Lily dubbed them “witch fuel,” I also learned a crucial lesson: unwrapping Kisses while the cookies bake is a recipe for chaos! Seriously, unwrap them *before* you start mixing. Trust me. Over the years, I’ve streamlined the process – the parchment paper is non-negotiable, and melting chocolate in a bowl set over simmering water (a double boiler) is foolproof if your microwave is temperamental. The biggest evolution? Embracing the “messy brim.” My early attempts were painstakingly neat, but Lily declared the wobbly, sprinkle-heavy ones “the most magic.” She was right! The charm is in the homemade imperfection. These cookies have traveled to school parties, book clubs pretending to be “Witches Monthly” meetings, and even a few grown-up Halloween dinners where they vanished faster than a ghost. They’re my edible reminder that joy doesn’t need to be complicated – just sweet, a little silly, and shared with love.
Your Witch Hat Wisdom: Solved!
Let’s tackle those pesky potion problems before they bubble up!
- Q: Help! My Kisses keep sliding off! What did I do wrong?
A: Ah, the Great Hat Slide! Two likely culprits: 1) Your cookies were still warm when you attached the Kiss. Chocolate melts, glue fails. Patience is key – let cookies cool COMPLETELY. 2) Not enough “glue” chocolate on the Kiss base. Dip it generously! If disaster strikes, re-melt a tiny bit of chocolate and “re-glue.” - Q: My cookie bases spread too much and became flat witches! How do I prevent that?
A> Flat hats are usually a butter issue! Ensure your butter is *softened*, not melted or greasy. Chilling the dough balls for 15-20 minutes before baking helps immensely. Also, double-check your flour measurement – spooning and leveling is crucial. Too little flour = spread city! - Q: Can I make these ahead of time? How do I store the magical hats?
A: Absolutely! Bake the cookie bases up to 3 days ahead; store cooled in an airtight container at room temp. Assemble the hats (attach Kisses and decorate) within a day of serving for best freshness and crunch. Store assembled hats in a single layer in an airtight container at room temp for 2-3 days. Avoid the fridge – it can make the cookies soggy and the chocolate sweat! - Q: My melted chocolate seized up and became lumpy! Can I salvage it?
A> Chocolate gremlins! Seizing happens from even a drop of water or overheating. Try rescuing it: Stir in a teaspoon of vegetable oil or shortening (not butter!) until smooth. If it’s truly scorched, sadly, start fresh. Remember: low heat and dry utensils are your best defense!
Witch Hat Sugar Cookies
Description
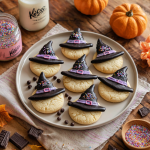
Butter, sugar, chocolate, and sprinkles—just a few pantry staples, and suddenly you’re a kitchen sorceress whipping up edible hats fit for every witchy gathering! These whimsical cookies transform simple sugar cookie bases into pointy chocolate-topped hats crowned with sprinkles. They’re charming, playful, and almost too cute to eat (almost).
Ingredients
Cookie Base
-
1 cup (225g) unsalted butter, softened
-
1 cup (200g) granulated sugar
-
1 large egg (or flax egg for vegan)
-
1½ tsp vanilla extract (or swap half with almond extract)
-
2½ cups (315g) all-purpose flour (or GF 1:1 blend)
-
½ tsp baking powder
-
¼ tsp salt
Toppings & Assembly
-
24 Hershey’s Kisses, unwrapped (or Rolos/mini Reese’s for variations)
-
½ cup chocolate chips, melted (semi-sweet recommended)
-
Colorful sprinkles or decorative sugar
-
Optional: Royal icing or candy melts for hat “buckles”
Instructions
-
Mix Dough – Cream butter + sugar until fluffy (3–4 min). Beat in egg + vanilla. In another bowl, whisk flour, baking powder, and salt. Add dry mix to wet, stir just until combined.
-
Shape & Bake – Roll dough into 1-inch balls, place on lined trays, flatten slightly. Bake at 350°F (175°C) for 10–12 mins until edges are set but centers still soft. Cool completely.
-
Attach Peaks – Dip flat bottoms of Kisses into melted chocolate, press onto cooled cookies. Hold briefly to set.
-
Create Brims – Pipe a circle of melted chocolate around the Kiss base, sprinkle generously before chocolate sets. Let firm up fully.
Notes
-
No Hat Slides: Always cool cookies completely before attaching Kisses.
-
Perfect Brims: Messy = magical. Wobbly lines + heavy sprinkles only add charm.
-
Time-Saver: Unwrap all Kisses before baking to avoid mid-spell chaos.
-
Storage: Keep in a single layer, airtight, at room temp for 2–3 days.
Nutrition
- Calories: 150 cal Per cookie
- Fat: 8g
- Carbohydrates: 18g
- Protein: 2g
Magical Morsel Info (Approximate)
Per Cookie: ~150 calories | 8g fat | 18g carbs | 2g protein
*Remember: Magic calories don’t count on Halloween! (Okay, maybe they do, but these are worth it!).
Final Thoughts: The Real Magic
The true enchantment of these Witch Hat Sugar Cookies isn’t in their adorable shape or even their buttery taste—it’s in the moments they create. The messy countertops, the sprinkle-covered giggles, the way a plate of these can turn an ordinary afternoon into a memory. They’re a reminder that baking is alchemy, transforming simple ingredients into joy. Whether you’re a seasoned baker or a first-time spellcaster, these cookies promise a little wonder. So preheat that oven, summon your inner kitchen witch, and remember: the best magic is always shared.
Now, go forth and bake mischief!


