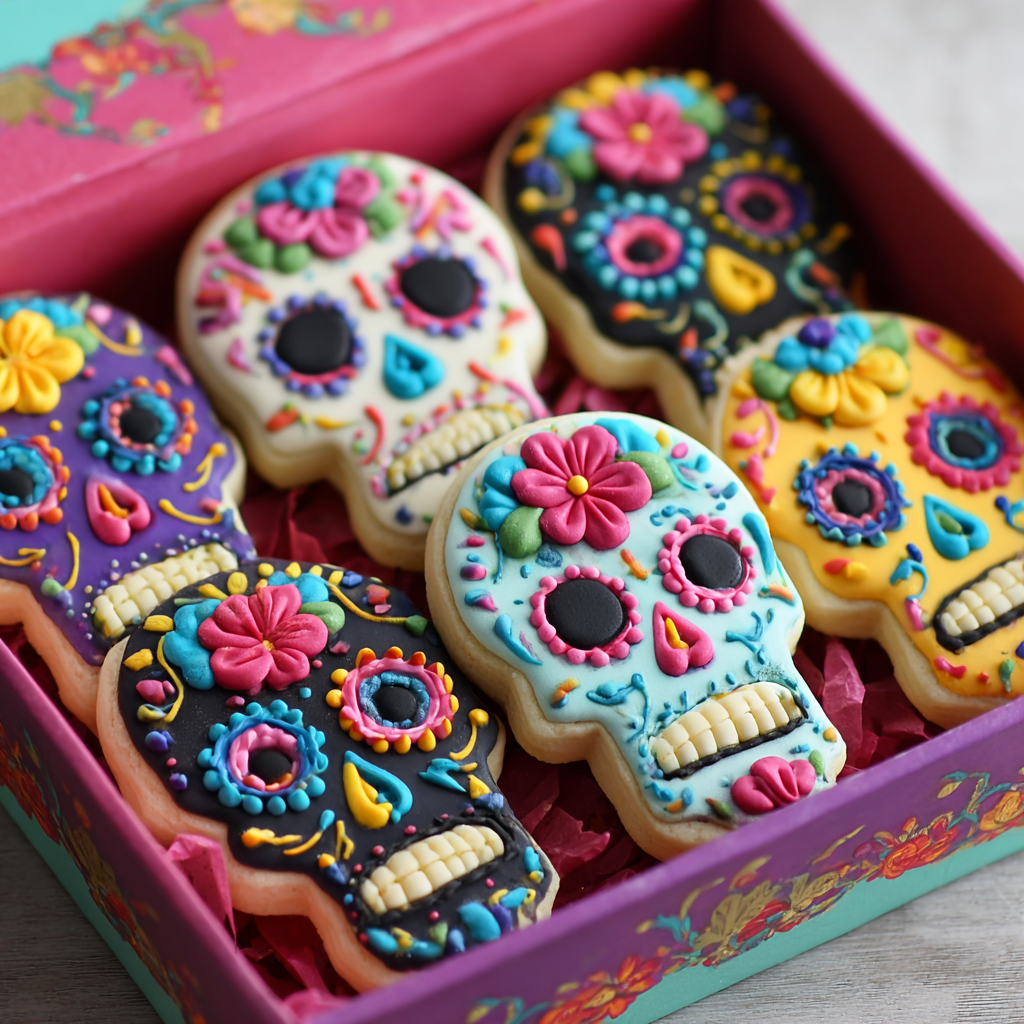
Let’s Bake Some Joy: Sugar Skull Cookies for Día de los Muertos!
Hey there, kitchen friend! Olivia here, apron dusted with powdered sugar and heart full of excitement. If your soul does a happy dance when vibrant colors meet buttery dough, you’re about to fall head over heels for today’s project. We’re making sugar skull cookies – those stunning edible artworks that transform kitchens into joyful studios during Día de los Muertos. This isn’t just baking; it’s a celebration of life, memory, and creativity that tastes like vanilla-kissed sunshine.
Now, I know intricate designs might seem intimidating, but here’s my chef-to-friend secret: these are easier than they look! With my step-by-step guidance and a “no perfection required” mindset, we’ll create cookies that honor tradition while making your taste buds sing. Whether you’re building an ofrenda for loved ones or simply craving a creative baking adventure, these skulls are your edible canvas. So grab your favorite mixing bowl, channel your inner artist, and let’s turn simple ingredients into a feast of color, flavor, and meaning. Trust me – your kitchen’s about to become the happiest place in the house!
Abuela’s Kitchen & My First Sugar Skull Fiasco
My love affair with these cookies started years ago during a trip to Oaxaca. I’d wandered into a bustling mercado, utterly mesmerized by tables piled high with candy skulls gleaming like edible jewels. Fast forward to my tiny Brooklyn kitchen, where I attempted my first batch for a friend’s Día de los Muertos gathering. Picture this: royal icing EVERYWHERE (including my cat’s tail), lopsided skulls that looked more like surprised potatoes, and pink dye stubbornly staining my fingertips for days. But when I brought them to the party? Magic happened.
People didn’t just eat them – they gathered around, pointing out designs, sharing stories about loved ones, and laughing at my “abstract” skulls. A sweet abuela even patted my hand saying, “Mija, the mess means you put your soul in them.” That’s when it clicked: perfection isn’t the point. These cookies are about connection – to tradition, to people we cherish (here and beyond), and to the playful joy of creating something beautiful with our own hands. Now, every sprinkle of colored sugar feels like a love letter to that moment.
Your Sugar Skull Toolkit: Ingredients & Smart Swaps
For the Cookies:
- 1 cup unsalted butter, softened – The flavor foundation! Chef insight: Leave it out for 30 minutes before starting. Too cold? Cookies get tough. Too warm? They spread. Substitution: Vegan butter works beautifully.
- 1 cup granulated sugar – Creates that classic crisp-yet-tender bite. Chef tip: For extra sparkle, use superfine sugar!
- 1 egg – Binds everything together. Substitution: Flax egg (1 tbsp ground flax + 3 tbsp water) for vegan friends.
- 1½ tsp vanilla extract – Warm, aromatic depth. Chef upgrade: Try Mexican vanilla for floral notes!
- ½ tsp almond extract (optional) – My secret weapon! Adds complexity. Allergy swap: Omit or use lemon extract.
- 2¾ cups all-purpose flour – Structure without toughness. Gluten-free: Use a 1:1 GF blend (add 1 tsp xanthan gum).
- ½ tsp baking powder – Lifts cookies slightly for perfect decorating surface.
- ½ tsp salt – Balances sweetness. Chef must: Never skip this flavor enhancer!
For the Royal Icing & Decorating:
- 2½ cups powdered sugar – The blank canvas. Sift it! Lumps clog piping tips.
- 2 tbsp meringue powder – Gives icing structure without raw egg whites. Substitution: 2 pasteurized egg whites.
- 3–4 tbsp water – Add gradually! Icing thickness is crucial.
- Gel food coloring – Chef essential: Gels (not liquids!) deliver vibrant hues without thinning icing.
- Piping bags + #1 or #2 tips – Precision tools for outlining. Hack: Use ziplock bags with tiny corner snips if needed!
Step-by-Step: Baking & Decorating Magic
1. Make Dough: In a large bowl, cream butter and sugar with a hand mixer until fluffy and pale (about 3 minutes). Beat in egg, vanilla, and almond extract. In a separate bowl, whisk flour, baking powder, and salt. Gradually add dry ingredients to wet, mixing just until combined. Chef hack: Scrape bowl sides often! Overmixing = tough cookies.
2. Chill & Shape: Divide dough into 2 discs, wrap in plastic, and chill 30 minutes. Roll out to ¼-inch thickness on a floured surface. Cut skull shapes. Pro tip: Dip cutter in flour between cuts to prevent sticking. Reroll scraps once.
3. Bake: Preheat oven to 350°F (175°C). Place cookies 1 inch apart on parchment-lined sheets. Bake 8-10 minutes until edges are *barely* golden. Critical step: They’ll look underdone – that’s perfect! Cool 5 minutes on sheet, then transfer to wire rack. MUST cool completely before icing!
4. Prepare Icing: Whisk powdered sugar and meringue powder. Add water 1 tbsp at a time. Beat 5-7 minutes until stiff peaks form. Consistency test: Drag a knife through icing; the line should hold for 15 seconds. Separate into bowls. Color with gels. Thin some portions with drops of water for “flood” icing (should flow like honey).
5. Decorate: Outline skulls with thick icing using a piping bag. Fill (“flood”) centers with thinner icing using a squeeze bottle or spoon. Let dry 1 hour. Pipe colorful designs! Designer tricks: Start with white base, add flowers on temples, swirls on forehead, dots along jawline. Keep a damp toothpick handy to fix mistakes. Breathe and have fun!
6. Dry: Let cookies dry untouched 6-8 hours (or overnight). Chef warning: Rushing = smudged masterpieces!
Sharing the Sweetness: Serving Your Sugar Skulls
Presentation is part of the magic! Arrange cookies on a vibrant Mexican Talavera platter or a simple wooden board lined with marigold petals. For an ofrenda, nestle them beside photos, candles, and pan de muerto. Package in clear cellophane bags tied with ribbon as heartfelt gifts. Pro tip: Add a tiny label sharing the name of a loved one each cookie honors. Serve with Mexican hot chocolate or spiced coffee – the warmth contrasts beautifully with the crisp cookies!
Make Them Your Own: Creative Twists!
- Spiced Dough: Add 1 tsp cinnamon + ½ tsp orange zest to dough for warm autumnal notes.
- Chocolate Base: Swap ½ cup flour for cocoa powder. Decorate with bright icing – stunning contrast!
- Vegan/Dairy-Free: Use vegan butter, flax egg, and aquafaba (3 tbsp whipped = 1 egg white) in icing.
- Kid-Friendly Shortcut: Skip piping! Flood cookies with one color, then immediately sprinkle with colored sanding sugar.
- Floral Fiesta: Focus designs entirely on marigolds, roses, and dahlias using edible gold dust accents.
Olivia’s Extra Pinches of Wisdom
Over the years, these cookies have become my edible diary. One batch featured teal skulls after my daughter’s “mermaid phase.” Another year, I accidentally used salt instead of sugar (disaster averted by re-rolling!). My biggest evolution? Letting go of “perfect.” Traditional sugar skulls are whimsical folk art – wobbly lines and asymmetrical dots add charm! I now keep a “practice cookie” for testing colors and laughing at blobs. Pro tip: Double the dough but bake in batches. Undecorated cookies freeze beautifully for 3 months! Most importantly: Play music, sip something yummy, and embrace the joyful mess. These aren’t just cookies; they’re edible hugs for the soul.
Your Sugar Skull Queries Solved!
Q: My icing is too runny/thick! Help!
A: Don’t panic! Too runny? Add powdered sugar 1 tbsp at a time. Too thick? Add water drop by drop. The “10-second rule” is key: Drag a knife through icing; if it flattens in 10 seconds, it’s perfect for flooding.
Q: Why did my cookies spread or lose shape?
A> Usually two culprits: 1) Dough wasn’t chilled enough (warm butter spreads). 2) Over-creaming butter/sugar. Mix just until combined after adding flour! If spreading persists, add 2 tbsp extra flour next batch.
Q: Can I make these ahead?
A> Absolutely! Bake cookies 1-2 days ahead; store airtight at room temp. Decorate 1 day before serving. Iced cookies keep 1 week in a single layer (not stacked!). Freeze UNdecorated cookies for 3 months.
Q: My food coloring bleeds! How to prevent?
A> Always let the base “flood” layer dry COMPLETELY (1 hour minimum) before adding details. Use gel colors (liquid causes bleeding). In humid climates, add 1 tsp corn syrup to icing to help set colors.

Sugar Skull Cookies
- Total Time: 35 minute
Description
Bright, bold, and joyfully sweet—these sugar skull cookies bring the spirit of Día de los Muertos to life in edible form. With buttery vanilla dough as the canvas and vibrant royal icing as the paint, each cookie becomes a tribute to love, memory, and creativity. They’re not just treats; they’re edible works of art that spark conversation, laughter, and connection. Perfect for an ofrenda, a gathering with friends, or simply a creative kitchen adventure.
Ingredients
For the Cookies
-
1 cup unsalted butter, softened
-
1 cup granulated sugar
-
1 egg (or flax egg for vegan)
-
1½ tsp vanilla extract (try Mexican vanilla for floral depth)
-
½ tsp almond extract (optional)
-
2¾ cups all-purpose flour (1:1 GF blend works)
-
½ tsp baking powder
-
½ tsp salt
For the Royal Icing
-
2½ cups powdered sugar (sifted)
-
2 tbsp meringue powder (or 2 pasteurized egg whites)
-
3–4 tbsp water (add slowly)
-
Gel food coloring (for bold, non-runny colors)
Decorating Tools
-
Piping bags with fine tips (#1 or #2)
-
Toothpicks (to fix details and pop bubbles)
Instructions
-
Make Dough: Cream butter + sugar until fluffy (3 mins). Add egg and extracts. In another bowl, whisk flour, baking powder, and salt. Mix dry into wet just until combined.
-
Chill & Cut: Divide dough, wrap, and chill 30 mins. Roll to ¼-inch thick, cut skull shapes, place on lined trays. Freeze 10 mins for sharp edges.
-
Bake: Bake at 350°F (175°C) for 8–10 mins until edges are barely golden. Cool fully on racks.
-
Mix Icing: Beat powdered sugar + meringue powder with water until stiff peaks (5–7 mins). Adjust consistency: thick for outlines, thinner for flooding. Divide into bowls, color with gels.
-
Decorate: Outline skulls with thick icing, flood centers with thin icing. Add swirls, flowers, and dots in bright colors once base layer sets. Use toothpicks for precision.
-
Dry: Let dry uncovered 6–8 hrs (or overnight) before stacking.
Notes
Día de los Muertos sugar skulls are folk art—wobbly lines and mismatched dots only add charm. Let go of perfection and let each cookie tell a story.
- Prep Time: 40 mins (plus chilling/decorating)
- Cook Time: 8–10 mins per batch
Nutrition
- Calories: 140–160 cal Per cookie
- Fat: 5g
- Carbohydrates: 18g
- Protein: 1g
Nutritional Nibbles (Per Cookie, Estimated)
Calories: 140-160 | Fat: 5g | Carbs: 18g | Protein: 1g
Final Thoughts: More Than Just a Cookie
Baking sugar skulls taught me that food is never just food. It’s a bridge—between generations, cultures, and even the living and the dead. One year, I made cookies with my neighbor Rosa, who shared stories of her late husband while piping tiny guitars (his favorite instrument) onto each skull. Another time, a child at a workshop asked if her dog, “who crossed the rainbow bridge,” could have a bone-shaped skull. That’s the magic of this tradition: it meets you where you are.
So whether you’re baking for an ofrenda, a Halloween party, or just because, remember: perfection is overrated. A lopsided grin on your skull? That’s character. Icing drips? Call it “modern art.” The goal isn’t Instagram-worthy cookies—it’s the laughter when your piping tip clogs, the quiet moment decorating in the kitchen at midnight, or the stories shared when someone asks, “Why did you add those tiny glasses?”


