
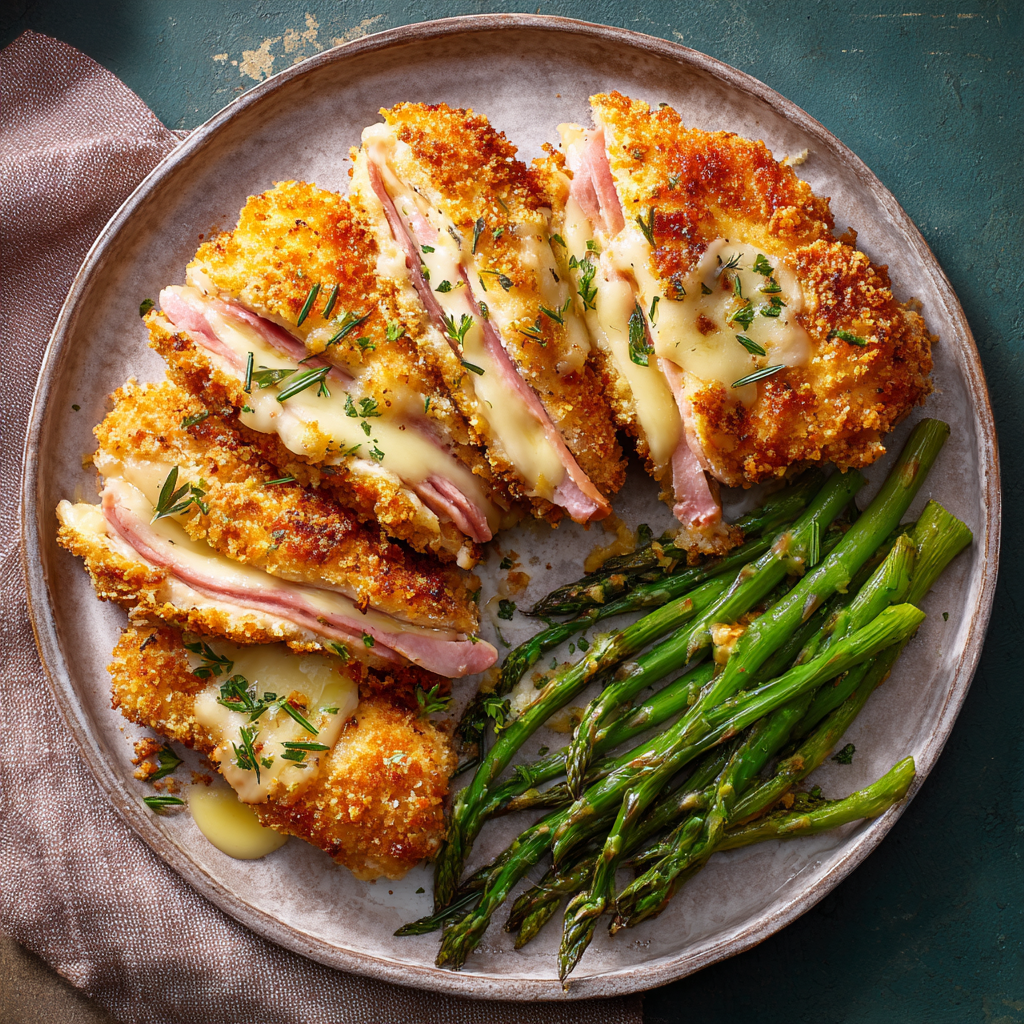
Easy Chicken Cordon Bleu: Your New Weeknight Hero!
Hey there, kitchen friend! Olivia here, waving from my flour-dusted countertop. Can we talk about that magical moment when crispy meets creamy, savory hugs salty, and dinner feels like a fancy bistro experience… in under 20 minutes? That’s exactly what this Easy Chicken Cordon Bleu delivers! Forget the complicated rolling and fussy stuffing of the traditional version. We’re keeping every bit of that glorious flavor – the juicy chicken, the smoky ham, that oozy Swiss cheese pull – but ditching the drama. Imagine golden, crunchy parcels of joy sizzling in your skillet while you barely break a sweat. Whether you’re racing against the clock after work or just craving pure, uncomplicated comfort, this recipe is your golden ticket. It’s the kind of dish that makes everyone at the table pause mid-bite, eyes wide, muttering “Mmmph!” through full mouths. Ready to turn simple ingredients into something unforgettable? Aprons on – let’s make some magic!
A Swiss Mishap & My Love Affair Begins
Picture this: Me, age 19, attempting “fancy” cooking for my now-husband on our third date. I tackled classic Chicken Cordon Bleu – and it was a glorious, cheese-leaking, toothpick-snapping disaster! One rogue roll-up even did a swan dive off the baking sheet. But you know what? We laughed until our sides hurt, ate the slightly wonky (but still delicious) results over candlelight, and I was hooked. That messy first try taught me a vital lesson: Flavor trumps perfection. This easy skillet version? It’s my love letter to that chaotic, cheesy beginning. It captures every bit of the magic – the crispy crunch, the molten cheese surprise, the hammy goodness – but skips the stress. It’s the recipe I make when I want that nostalgic, happy feeling without the potential kitchen gymnastics. It never fails to spark joy (and zero plate-diving incidents!).
Your Flavor Toolkit: Simple Stars, Big Impact
- 4 thin chicken cutlets (or pounded breasts): The speedy secret! Look for “thin-cut” chicken breasts (about 1/4 inch thick). No luck? Place a full breast in a zip-top bag and gently pound it thin with a rolling pin or skillet. Chef’s Tip: Pounding also tenderizes! Sub: Turkey cutlets work beautifully.
- 4 slices deli ham: Go for good-quality, slightly thicker slices (like Black Forest or Virginia ham). Thin, flimsy slices tear easily. Chef’s Insight: The ham adds salty depth – it’s essential! Sub: Prosciutto (use less, it’s saltier) or cooked crumbled bacon.
- 4 slices Swiss cheese: The melty heart! Classic Swiss melts perfectly. Sub Tip: Gruyère is luxurious, Provolone is milder, or use Havarti for extra creaminess. Avoid pre-shredded cheese – it doesn’t melt as smoothly!
- ½ cup breadcrumbs: Your crispy armor! Panko gives extra crunch, regular breadcrumbs work fine. Flavor Boost: Use seasoned breadcrumbs, or add 1 tsp dried herbs (thyme, parsley) to plain ones. Sub: Gluten-free panko for dietary needs.
- ¼ cup grated Parmesan: The flavor bomb! Adds salty, umami punch to the crust. Chef’s Must: Freshly grated tastes infinitely better than the canned stuff. Sub: Pecorino Romano for sharper tang.
- 1 egg, beaten: The glue! Helps the crust stick beautifully. Quick Tip: Add a splash of water or milk to make dipping easier.
- 1 tbsp olive oil: For that perfect golden sear. Sub Tip: Avocado oil works well for high-heat cooking.
- Salt and black pepper to taste: Season every layer! Especially the chicken before assembly.
- Dijon mustard, for serving (optional): The bright finishing touch! Its tang cuts the richness. Chef’s Love: A dollop mixed with a little honey is divine.
Let’s Get Sizzling: Simple Steps to Crispy Bliss
Step 1: Prep & Roll (The Foundation!)
Lay out those chicken cutlets flat. Season both sides generously with salt and pepper – this builds flavor from within! Place one slice of ham neatly on top of each cutlet, followed by a slice of Swiss cheese. Now, roll them up tightly, starting from the shorter end. Think snug burrito, not loose scroll! If they feel rebellious, secure them with 1-2 toothpicks through the seam. CHEF HACK: Slightly overlap the ham and cheese near the end of the chicken – it helps contain the melt! Time Saver: Buy pre-sliced thin cutlets if available.
Step 2: Crust Station Setup (The Fun Part!)
Grab two shallow bowls or plates. In one, whisk the egg until smooth (that splash of water helps!). In the other, combine the breadcrumbs and grated Parmesan, mixing thoroughly. This duo is your crispy magic dust! CHEF TIP: Use one hand for wet dipping (egg) and the other for dry coating (crumbs). Saves major finger-breading mess!
Step 3: Dip & Coat (Seal the Deal!)
Working one at a time, gently dip a chicken roll-up into the beaten egg. Let any excess drip off – too much egg makes the coating soggy. Immediately transfer it to the breadcrumb mixture. Use your dry hand to scoop and press the crumbs firmly onto all sides, ensuring an even, generous coating. Place the coated roll-up on a clean plate. Repeat the love for all four! CRUNCH SECRET: Pressing the crumbs on firmly ensures they adhere and create maximum crispiness.
Step 4: Skillet Sizzle (Golden Perfection!)
Heat the olive oil in a large, non-stick or cast-iron skillet over medium-high heat. You want it shimmering but not smoking. Carefully add the chicken roll-ups, seam-side down if possible. Don’t crowd the pan – cook in batches if needed. Let them sizzle undisturbed for 3-4 minutes per side. Resist the urge to peek too early! You’re looking for a deep, golden-brown crust. Flip carefully using tongs. Cook the other side until equally gorgeous and the chicken is cooked through (internal temp should reach 165°F/74°C – about another 3-4 mins). CHEF HACK: If the crust browns too fast before chicken cooks, reduce heat slightly and cover the pan for a minute or two to steam-finish.
Step 5: Rest & Revel (The Hardest Part!)
Transfer your glorious golden bundles to a plate or cutting board. Let them rest for 3-5 minutes before serving. WHY? This allows the juices to redistribute, ensuring moist chicken, and gives the molten cheese a second to set slightly (so it doesn’t *all* escape on the first cut!). Remove any toothpicks now.
Plating Up the Happy
Presentation is easy-peasy! Slice each roll-up diagonally in half to reveal that stunning cheesy swirl inside. Arrange them prettily on plates, maybe leaning the halves against each other. A simple, vibrant side makes it pop: think steamed green beans tossed with lemon zest, a crisp arugula salad with a light vinaigrette, or roasted baby potatoes. That optional Dijon? Serve it on the side in a little ramekin for dipping or dolloping. It adds the perfect tangy counterpoint to the rich chicken and cheese. Pour a glass of crisp white wine or sparkling water with lemon – dinner is served!
Mix It Up: Your Cordon Bleu, Your Rules!
This recipe is a dream canvas! Here are some tasty twists:
- Italian Stallion: Swap Swiss for Provolone or Mozzarella, ham for prosciutto, and add 1 tsp dried Italian herbs to the breadcrumbs. Serve with marinara for dipping!
- Spinach & Feta Fling: Layer a handful of fresh baby spinach and a sprinkle of crumbled feta cheese on the ham before rolling. Greek vibes!
- Kickin’ Cajun: Add 1 tsp Cajun seasoning to the breadcrumb mix. Use smoked Gouda instead of Swiss. Boom! Spicy, smoky goodness.
- Lighter Touch: Use low-sodium ham and part-skim Swiss or Mozzarella. Bake at 400°F (200°C) for 15-20 mins instead of pan-frying (spray lightly with oil first).
- Pork Power: Use thin pork cutlets instead of chicken! Pairs wonderfully with apple chutney.
Olivia’s Extra Pinch of Love
This recipe is my weeknight warrior, born from years of craving the fancy French bistro vibe without the fuss. I’ve learned a few things: First, don’t fear the toothpick! They’re little lifesavers. Second, if a bit of cheese oozes out while cooking? That’s not a flaw, it’s a feature – crispy cheese bits are chef’s treats! One time, my cat, Mr. Whiskers, became utterly convinced the sizzling sound meant treats for him and staged a full sit-in protest by the stove. Let’s just say he got a tiny piece of ham (sans seasoning!) as a peace offering. Over time, I’ve embraced the simplicity. It’s evolved from my early, overly-ambitious attempts to this streamlined joy. The core remains: chicken, ham, cheese, crunch, love. That’s what makes people gather in the kitchen, forks at the ready!
Your Questions, Answered!
Q: My cheese exploded everywhere in the pan! Help?
A: Don’t panic! A little melt-out is normal (and delicious!). To minimize it: 1) Ensure your roll is tight. 2) Make sure the cheese is fully covered by the ham/chicken at the ends. 3) Don’t overload the cheese slice – stick to one. 4) Let the rolls rest a few minutes before cooking so the cheese firms up slightly. Scoop up any escaped crispy cheese bits – they’re gold on top of your veggies!
Q: Can I make these ahead of time?
A: Absolutely! Assemble and coat the roll-ups. Place them on a plate or baking sheet, cover tightly with plastic wrap, and refrigerate for up to 4 hours before cooking. Let them sit at room temp for 10-15 minutes before frying. You can also freeze uncooked, coated roll-ups on a baking sheet, then transfer to a freezer bag for up to 1 month. Cook from frozen, adding a few extra minutes per side (cover if browning too fast).
Q: The breading is falling off! What did I do wrong?
A: The main culprits are usually moisture or not pressing firmly enough. Pat the chicken cutlets dry with paper towels before assembling. Let the egg-dipped roll drip off excess egg thoroughly before coating in crumbs. Most importantly: PRESS the crumbs firmly onto all sides. That adhesion is key! Also, ensure your oil is hot enough before adding the chicken – a sizzle when it touches the pan is essential for sealing the crust fast.
Q: Is the chicken really cooked through that fast?
A: Using thin cutlets is crucial! At 3-4 minutes per side over medium-high heat, they cook quickly. The best way to be sure? Use an instant-read thermometer inserted into the thickest part – it should read 165°F (74°C). If unsure, make a small cut in one to check the center is no longer pink. If your cutlets are thicker than 1/4 inch, they’ll need longer.
Easy Chicken Cordon Bleu
- Total Time: 20 mins
Description
Craving something crispy, cheesy, and comforting—but don’t have time for kitchen gymnastics? This 20-minute Chicken Cordon Bleu is your golden answer. Juicy chicken cutlets, smoky ham, and melty Swiss cheese all rolled into crunchy, pan-fried bundles of joy. It’s elegant enough to impress but easy enough for any weeknight. No baking, no stress—just flavor-packed happiness in every bite.
Ingredients
Craving something crispy, cheesy, and comforting—but don’t have time for kitchen gymnastics? This 20-minute Chicken Cordon Bleu is your golden answer. Juicy chicken cutlets, smoky ham, and melty Swiss cheese all rolled into crunchy, pan-fried bundles of joy. It’s elegant enough to impress but easy enough for any weeknight. No baking, no stress—just flavor-packed happiness in every bite.
Instructions
-
Assemble: Season chicken. Layer with ham and cheese, then roll tightly and secure with toothpicks.
-
Bread: Dip rolls in egg, then coat with breadcrumb + Parmesan mix. Press firmly for max crisp!
-
Cook: Heat oil in skillet over medium-high. Sear rolls 3–4 mins per side until golden and cooked through (165°F inside).
-
Rest & Serve: Let rest 5 mins. Slice diagonally, plate, and serve with Dijon on the side.
Notes
-
Want it lighter? Bake at 400°F for 15–20 mins.
-
Add Italian herbs to crumbs for a twist.
-
Swap in turkey cutlets, Havarti cheese, or even spinach inside!
- Prep Time: 10 mins
- Cook Time: 10 mins
Nutrition
- Calories: 410 cal Per Serving
- Sodium: 760mg
- Fat: 24g
- Carbohydrates: 14g
- Protein: 38g
Nutritional Info (Per Serving)
Approximate values based on specific ingredients used.
Calories: ~410 | Protein: 38g | Carbs: 14g | Fat: 24g | Fiber: 1g | Sugar: 1g | Sodium: ~760mg
Prep: 5 mins | Cook: 10 mins | Total: 15 mins | Serves: 4
Final Thoughts: Why This Recipe Earns a Permanent Spot in Your Rotation
This Easy Chicken Cordon Bleu isn’t just a meal—it’s a confidence-builder. It proves that “fancy” flavors don’t require fussy techniques. Whether you’re cooking for a date night (like my 19-year-old self), wrangling hungry kids, or just craving comfort, it delivers every time.
The real beauty? It’s a blueprint for creativity. Once you master the basic roll-dip-sizzle method, the variations are endless. Stuff it with pesto and sun-dried tomatoes, wrap it in bacon instead of ham, or go keto with almond flour breading.
So here’s to less stress, more crunch, and those glorious cheese pulls. May your skillet always sizzle, and your toothpicks hold firm. Now go forth and make magic—one golden roll at a time!


