
Why Homemade Pop-Tarts Are Your New Favorite Treat
Hey there, friend! Olivia here, waving hello from my flour-dusted kitchen counter. Can you smell it? That intoxicating, warm, and utterly cozy aroma of cinnamon and butter weaving through the air? It’s the scent of pure nostalgia, wrapped in flaky pastry and dripping with sweet glaze. If you’re anything like me, the mere mention of a Pop-Tart probably sends you straight back to childhood mornings, eagerly tearing open that foil packet. But let me tell you a little secret: the store-bought version? It’s got nothing on what we’re making today.
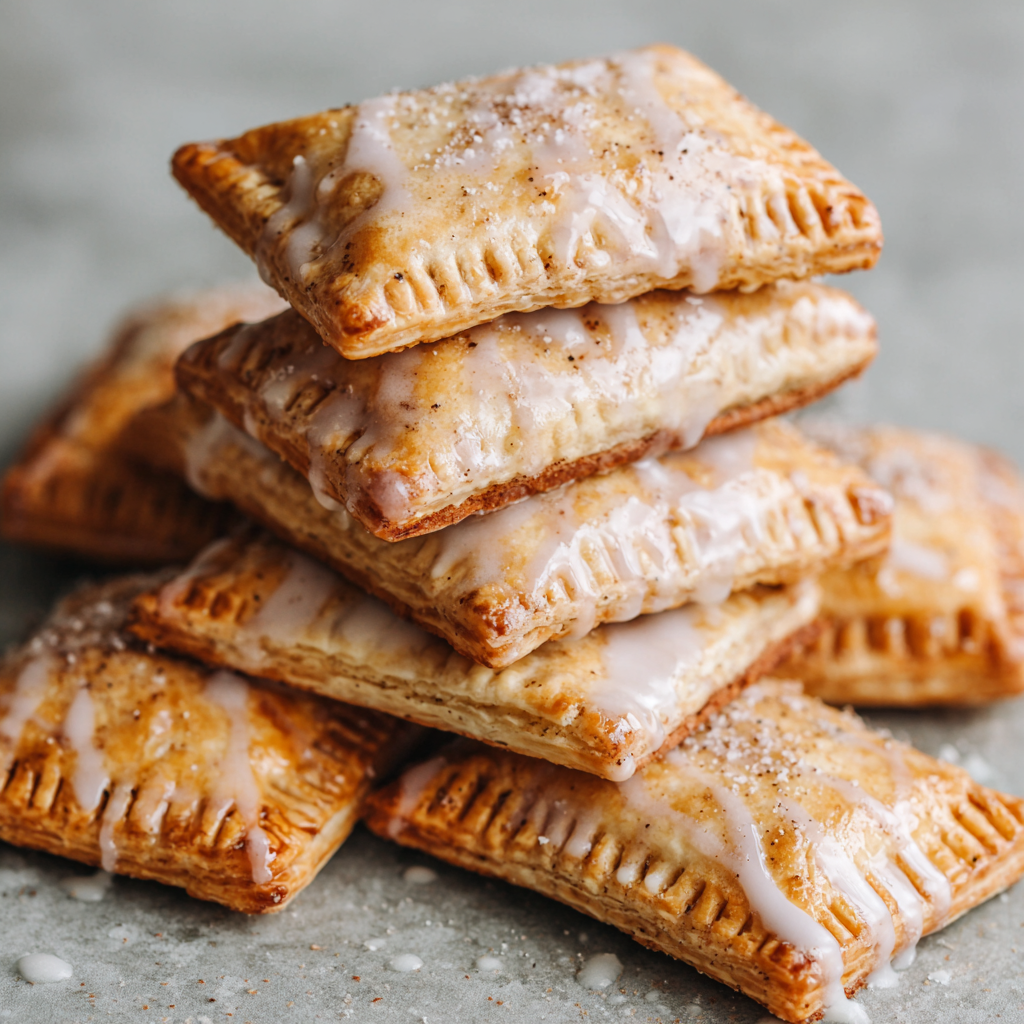
These Homemade Cinnamon Pop-Tarts are a revelation. Imagine: layers of buttery, tender pastry hugging a molten core of spiced cinnamon-sugar filling, all crowned with a silky vanilla-cinnamon glaze that sets to a perfect, crackly sweetness. They’re crisp where they should be, gloriously gooey inside, and taste like a warm hug feels. And because sharing is caring (and let’s be real, you’ll want to stash some in the freezer!), we’re making a double batch—about 16 glorious pastries ready to conquer breakfasts, snack attacks, and dessert cravings. No fancy skills required, just a love for good food and maybe a slightly messy apron. Ready to bake some magic? Let’s roll up our sleeves!
My Love Affair with Pop-Tarts: A Sweet Memory
My obsession with Pop-Tarts started young. Every Friday night in the ’90s meant a sleepover at my grandma’s house. Her rule? “No real cooking on movie night!” So, we’d curl up on her floral sofa, watching old musicals, armed with foil-wrapped toaster pastries. She always chose cherry; I was fiercely loyal to cinnamon. We’d giggle as the filling inevitably bubbled out the sides, creating sticky, caramelized edges we’d fight over. It wasn’t gourmet, but it was pure, sugary joy.
Years later, trying to recreate that feeling for my own kids, I grabbed a box from the store. One bite… and disappointment. It tasted flat, artificial, nothing like that warm, spiced memory. That’s when I decided: it was time to make my own magic. After countless trials (some leaky, some tough, all deliciously edible!), this recipe was born. Now, baking these pop-tarts with my kids, flour flying everywhere, the kitchen smelling like a cinnamon roll factory? That’s the real nostalgia. It’s messy, it’s sweet, and it tastes like love. Grandma would definitely approve.
Gathering Your Ingredients: Building Blocks of Bliss
Don’t let the list intimidate you! We’re using simple pantry staples transformed into something extraordinary. Here’s what you’ll need for our double batch of joy:
- All-Purpose Flour (5 cups / 626g + 2 tbsp for filling): The foundation of our flaky pastry. For extra tenderness, swap half with pastry flour! Chef Insight: Spoon flour into your cup measure and level it off—don’t scoop! This prevents dense pastry.
- Granulated Sugar (4 tsp): Just a touch in the dough balances the filling and aids browning.
- Salt (2 tsp): Crucial flavor enhancer! It makes the butter and cinnamon sing. Use fine sea salt.
- Unsalted Butter, chilled & cubed (2 cups / 32 Tbsp / 452g): The star! Keep it COLD. This creates steam pockets for flaky layers. Sub Tip: In a pinch, frozen grated butter works wonders!
- Ice Water (1 cup / 240ml + more if needed): Hydrates the dough without melting the butter. Add slowly!
- Brown Sugar, packed (1 cup / 200g): Dark or light both work. Dark adds deeper molasses notes. Chef Insight: Pack it firmly into your measuring cup for accuracy.
- Ground Cinnamon (4 tsp for filling + 1 tsp for glaze): Use the best you have! Freshly ground Vietnamese cinnamon is my splurge. This is our cozy spice superstar.
- Egg Wash (2 large eggs + 4 tsp milk): Gives that gorgeous golden sheen and helps seal the edges.
- Confectioners’ Sugar, sifted (1.5 cups / 180g): The base of our dreamy glaze. Sifting is non-negotiable for smoothness!
- Milk for Glaze (2 tbsp / 30ml): Whole milk is best for richness, but any works. Adjust for your perfect drizzling consistency.
- Vanilla Extract (1/2 tsp): The warm hug in the glaze. Pure extract makes all the difference.
Let’s Get Baking: Step-by-Step Pop-Tart Magic
Alright, team! Time to channel our inner pastry chef. Don’t stress—I’m walking you through every step with my favorite kitchen hacks. Remember: cold butter + patience = flaky perfection!
- Make the Dough (The Cold Butter Rule!): Grab a large bowl. Whisk together the 5 cups flour, granulated sugar, and salt. Now, add those chilled butter cubes. Chef Hack: Use a pastry cutter or even two forks to “cut” the butter into the flour until you get pea-sized crumbs. Some bigger chunks are GOOD—they create flakes! Slowly drizzle in the ice water, mixing gently with a fork just until the dough starts to clump. Don’t overmix! It should look shaggy, not smooth. If it seems dry, add ice water 1 tbsp at a time. Divide the dough into two equal disks, wrap tightly in plastic, and chill for at least 1 hour (up to 2 days). Why? This relaxes the gluten and re-chills the butter, guaranteeing tenderness and preventing shrinkage.
- Whip Up the Filling: In a small bowl, mix the packed brown sugar, 4 tsp cinnamon, and 2 tbsp flour. The flour is our secret weapon against a Niagara Falls-level filling leak! Set aside.
- Roll & Cut (Embrace the Flour!): Lightly flour your counter and rolling pin. Take one dough disk out of the fridge. Roll it out to about ⅛-inch thickness—aim for a rough rectangle. Chef Hack: Roll from the center out, turning the dough quarter turns occasionally to prevent sticking and ensure even thickness. Use a sharp knife or a pastry wheel to cut into 3×4 inch rectangles. Re-roll scraps once. Repeat with the second disk. You should have 32 rectangles total (16 tops, 16 bottoms).
- Assemble & Seal (The Egg Wash is Key!): Line two large baking sheets with parchment paper. Place 16 rectangles on the sheets (they’ll be the bottoms). Spoon about 1 heaping tablespoon of filling into the center of each, leaving a ½-inch border. Whisk the eggs and 4 tsp milk for your egg wash. Brush this wash generously around the exposed edges of each bottom rectangle. Carefully place a top rectangle over each filled bottom, aligning the edges. Gently press down around the filling with your fingertips to adhere. Now, take a fork and firmly crimp all around the edges to seal tightly—this is CRUCIAL to prevent leaks! Poke the top of each pop-tart 3-4 times with the fork for steam vents. Pop the sheets back in the fridge for 20 minutes (this re-chills the butter, ensuring maximum puff!). Preheat your oven to 375°F (190°C) during this chill.
- Bake to Golden Perfection: Take the pop-tarts out of the fridge. Brush the tops generously with the remaining egg wash. This gives that beautiful shine! Bake for 20-25 minutes, rotating the sheets halfway through, until they’re a deep, glorious golden brown. Watch closely near the end! Let them cool completely on the baking sheets. They’ll firm up as they cool.
- Glaze Like a Pro: While they cool, make the glaze. Sift the confectioners’ sugar into a bowl (seriously, skip this and risk lumps!). Whisk in the 2 tbsp milk, 1 tsp cinnamon, and vanilla extract. Want a thicker glaze? Add less milk. Want it pourable? Add milk ½ tsp at a time. Drizzle or spread generously over the *completely cooled* pop-tarts. Let the glaze set for about 30 minutes before serving (if you can wait!).
How to Serve These Cinnamon Delights
Warm? Room temp? Straight from the freezer? You can’t go wrong! For the ultimate experience, gently reheat a pop-tart in a 300°F oven for 5-8 minutes until the filling gets oozy again and the pastry crisps back up. Pair it with a big mug of strong coffee, a cold glass of milk (for serious nostalgia points!), or a steaming chai latte. These are perfect for brunch buffets, packed into lunchboxes (once fully cooled and glazed), or as a sweet surprise tucked into a picnic basket. Stack them high on a vintage cake stand for serious “wow” factor at your next gathering!
Get Creative: Fun Variations to Try
Once you’ve mastered the classic cinnamon, the pop-tart world is your oyster! Here are some delicious twists:
- Apple Cinnamon: Add ½ cup finely chopped dried apples or ¼ cup thick apple butter to the cinnamon filling.
- Brown Sugar & Pecan: Mix ½ cup finely chopped toasted pecans into the filling. Add a pinch of nutmeg!
- Chocolate Fudge: Replace the cinnamon filling with 1 cup chocolate chips + 2 tbsp cocoa powder + 2 tbsp brown sugar. Drizzle with chocolate glaze (sub cocoa powder for cinnamon in the glaze).
- Berry Bliss: Swap the cinnamon filling for ¾ cup thick berry jam (like strawberry or raspberry). Add 1 tsp lemon zest to the glaze.
- Vegan Friendly: Use top-quality vegan butter sticks (chilled!) and swap the egg wash for plant-based milk or aquafaba. Use maple syrup or agave in the glaze instead of milk.
A Few More Things from My Kitchen to Yours
This recipe feels like an old friend now, but it definitely had some growing pains! My first batch? Let’s just say the filling erupted like a cinnamon volcano, creating a sticky, delicious mess on my baking sheet (we still ate every crumb!). I learned the hard way: chill that butter, chill the dough, chill the assembled tarts, and SEAL THOSE EDGES! Don’t be tempted to overfill, no matter how much you love that spiced sugar. The double batch was born out of necessity – one batch disappeared far too fast with my family of taste-testers (a.k.a. hungry teenagers and neighbors who mysteriously appear when the oven dings). Freezing is a lifesaver! Pop unglazed, baked pop-tarts in a freezer bag. Reheat straight from frozen in a toaster oven or low oven, then glaze. The dough can also be frozen for up to 3 months. Thaw overnight in the fridge before rolling. Embrace the flour on your nose and the joy in every bite – that’s the real recipe.
Your Pop-Tart Questions, Answered
Q: Help! My filling leaked out everywhere during baking. What went wrong?
A: Leaks are usually due to: 1) Not sealing the edges tightly enough with the fork crimp (really press down!), 2) Filling too close to the edge (leave that ½-inch border!), 3) Forgetting the steam vents (poke those tops!), or 4) Dough getting too warm before baking (chilling is non-negotiable!). The flour in the filling helps, but sealing is key. A little leakage is normal and tasty!
Q: Can I make the dough in a food processor?
A: Absolutely! Pulse the flour, sugar, and salt a few times. Add cold butter cubes and pulse until you get pea-sized pieces. Transfer to a bowl, then drizzle in ice water, mixing with a fork until shaggy. Proceed as usual. Be careful not to over-process the butter!
Q: Do I have to use the egg wash?
A: The egg wash gives that beautiful golden color and sheen. If you can’t use eggs, you can brush the tops with heavy cream, milk, or even a light maple syrup wash (1 tbsp syrup + 1 tsp water) for browning, but the color won’t be quite as rich. The edge seal *must* use a wash (egg, milk, or cream) to stick properly.
Homemade Cinnamon Pop-Tarts
- Total Time: 2 hrs 15 mins
Description
These aren’t your foil-wrapped, toaster-bound Pop-Tarts. These are buttery, golden pastries with gooey cinnamon-sugar centers, crowned with a velvety vanilla glaze and made from scratch with love. Perfect for cozy mornings, sweet cravings, or reliving movie-night memories, this double batch of homemade cinnamon Pop-Tarts is flaky, warm, and downright magical. Bonus: they freeze beautifully for whenever the craving hits. Let’s roll out the love, one rectangle at a time.
Ingredients
Pastry:
-
5 cups (626g) all-purpose flour
-
4 tsp granulated sugar
-
2 tsp fine sea salt
-
2 cups (452g) unsalted butter, cold and cubed
-
1 cup (240ml) ice water
Filling:
-
1 cup (200g) packed brown sugar
-
4 tsp ground cinnamon
-
2 tbsp all-purpose flour
Egg Wash:
-
2 large eggs + 4 tsp milk
Glaze:
-
1½ cups (180g) powdered sugar, sifted
-
2 tbsp milk
-
1 tsp cinnamon
-
½ tsp vanilla extract
Instructions
-
Make Dough: Cut cold butter into flour, sugar, and salt until crumbly. Slowly mix in ice water until dough forms. Divide into two disks, wrap, and chill for 1 hour.
-
Make Filling: Mix brown sugar, cinnamon, and flour in a small bowl.
-
Roll & Cut: Roll each dough disk to ⅛-inch thick. Cut into 3×4-inch rectangles (you’ll get 32 total).
-
Assemble: Spoon filling onto 16 rectangles, brush edges with egg wash, top with remaining dough, press to seal, and crimp with a fork. Poke steam holes.
-
Chill Again: Chill assembled tarts for 20 minutes. Preheat oven to 375°F (190°C).
-
Bake: Brush tops with egg wash and bake for 20–25 mins until golden. Cool completely.
-
Glaze: Whisk glaze ingredients. Spread over cooled tarts. Let set 30 minutes.
Notes
• Chill = Flaky. Don’t skip it.
• Seal edges tightly to prevent leaks.
• Freeze unglazed tarts for future toasty goodness.
- Prep Time: 30 mins
- Cook Time: 25 mins
Nutrition
- Calories: 340 cal Per Per Pop-Tart
- Sugar: 20g
- Fat: 18g
- Carbohydrates: 40g
- Protein: 4g
Q: How long do these stay fresh? How do I store them?
A: Glazed pop-tarts are best enjoyed within 1-2 days. Store them in an airtight container at room temperature. For longer storage, freeze unglazed, baked pop-tarts for up to 3 months. Thaw and warm, then glaze fresh. You can also freeze the unbaked, assembled pop-tarts (before the egg wash top). Bake straight
Final Thoughts: Why You’ll Never Go Back to Store-Bought
Homemade Pop-Tarts aren’t just a recipe—they’re an experience. From the science of flaky layers to the joy of customization, every step makes them worth the effort. They’re warmer, richer, and more personal than anything from a box.
And let’s be real: nothing beats the smell of cinnamon and butter filling your kitchen. Whether you’re reliving childhood memories or creating new ones, these pastries are a little piece of happiness you can hold in your hand.
So, next time you’re tempted by that foil-wrapped rectangle, remember: you can make something better. And trust me, once you do, there’s no going back.


