
When a S’more and a Magic Bar Fall in Love: Meet Your New Favorite Dessert
Hey there, friend! Come on in, grab an apron, and get ready for your kitchen to smell like a happy campfire meets a cozy bakery. I’m so excited to share this recipe with you today because it’s one of those legendary, “please-can-I-have-the-recipe” kind of treats. We’re talking about my 5-Layer Crispy S’mores Bars.
You know that feeling when you’re craving something sweet, but you don’t want to fuss with creaming butter and sugar, chilling dough, or any of that fancy pastry chef business? Yeah, me too. Some days, you just need a dessert that delivers maximum joy with minimal effort. That’s exactly what these bars are all about.
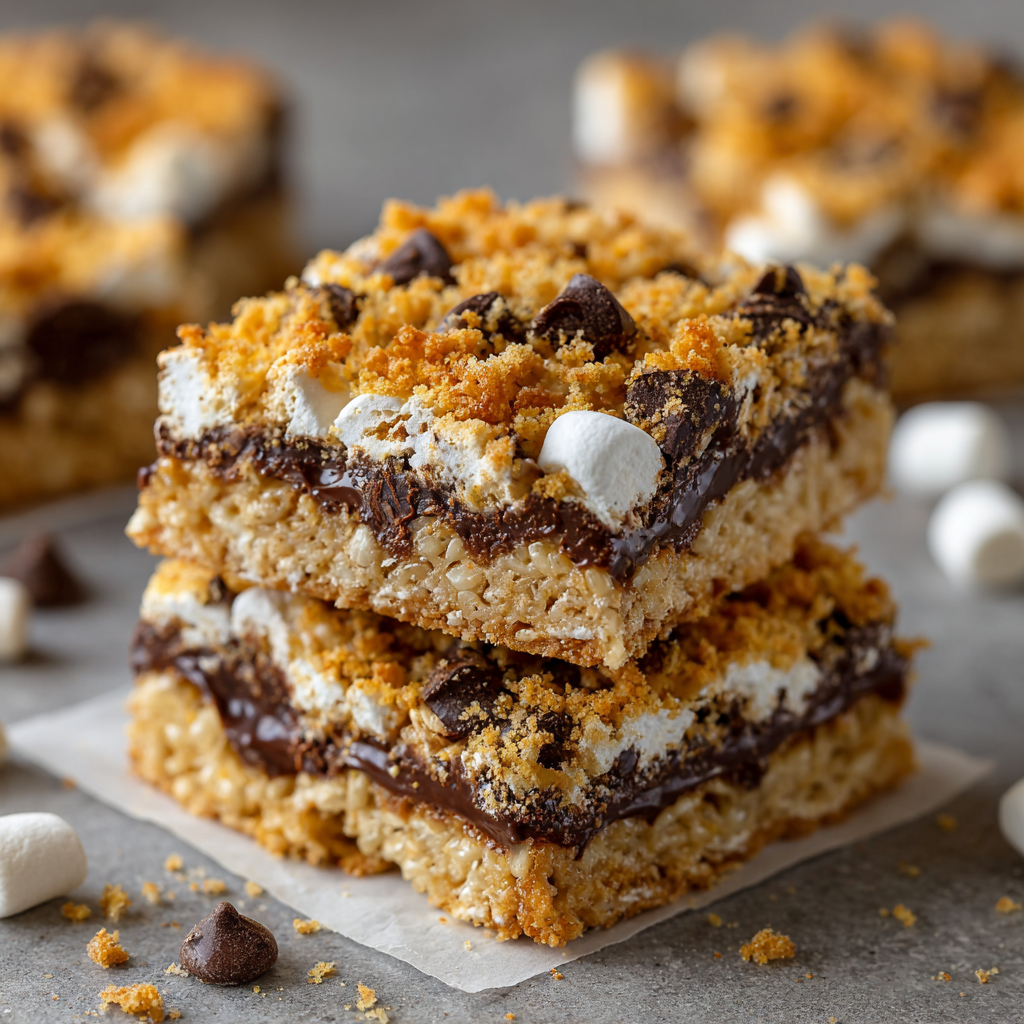
Imagine this: a crunchy, buttery base made from Rice Krispies (yes, you read that right!), a pillow-soft layer of toasted mini marshmallows, a river of melted chocolate chips, the nostalgic crunch of graham crackers, and the whole glorious mess is held together by a golden, caramel-like drizzle of sweetened condensed milk. It bakes up into this incredible mosaic of textures—crispy, chewy, gooey, and downright magical.
This is the kind of dessert that disappears before it even has a chance to cool completely. It’s a guaranteed hit at potlucks, the perfect peace offering for a bake sale, and the ultimate “I-love-you” for your family on a random Tuesday. So, let’s make a little magic together, shall we?
The Campfire That Started It All
This recipe always takes me back to my grandparents’ backyard. Every summer, my grandpa would build a proper fire pit, and we’d have s’mores night. I was the kid who would patiently roast my marshmallow to a perfect golden brown, only to immediately ruin the technique by shoving a giant, too-big piece of chocolate and a crumbly graham cracker into the mix. I’d end up with more marshmallow on my cheeks than in my mouth, but oh, was it worth it.
One rainy evening, the campfire plans were cancelled, and my little heart was shattered. My grandma, the ultimate kitchen wizard, saw my pout and declared, “No fire? No problem!” She ushered me into the kitchen, pulled out a box of cereal, a bag of marshmallows, and a can of that magical sweet milk. We layered everything into a pan, popped it in the oven, and created an indoor s’more that was even better than the original. It was our secret recipe for years. Today’s version is a loving nod to her—a little more structured, but with the same beautiful, chaotic, gooey soul. It’s proof that the best memories often find a way into our recipes.
Gathering Your Gooey, Crunchy, Chocolatey Crew
Here’s the beautiful part: you probably have most of this in your pantry right now! No fancy trips to the store required. Let’s break down our all-star cast of characters.
- 6 cups Rice Krispies cereal: This is our genius base! It gives a light, crispy texture that’s so much fun compared to a traditional flour base. Chef’s Insight: Make sure your cereal is fresh for the best crunch. A stale box will make for a sad, soft base.
- 1/2 cup melted butter or margarine: This gets drizzled right over the cereal, toasting it and giving it a rich, buttery flavor. Substitution Tip: You can use salted or unsalted butter here. I often use salted because I love that sweet-and-salty kick! For a dairy-free version, a plant-based butter works wonderfully.
- 2 cups mini marshmallows: The smaller the marshmallow, the more evenly they melt and distribute their pillowy goodness. Chef’s Insight: Don’t pack them down! Let them sit loosely so the sweetened condensed milk can seep through.
- 1 cup semi-sweet chocolate chips: The classic s’mores chocolate. Substitution Tip: Feel free to mix it up! Milk chocolate chips will make it sweeter, dark chocolate chips will add a sophisticated bitterness, or even peanut butter chips would be a delicious twist.
- 1/2 package graham crackers, crushed: This is our top-layer crunch! It gives you that authentic graham cracker flavor and a wonderful texture. Chef’s Insight: You can crush them in a bag with a rolling pin for a rustic look, or pulse them in a food processor for a more even crumb. I like a mix of fine powder and a few bigger chunks for texture.
- 1 can (14 oz) sweetened condensed milk: The glue, the magic, the golden ribbon that holds it all together! It caramelizes in the oven, binding every layer into one cohesive, gooey bar. Important Note: Do NOT use evaporated milk—it’s not the same thing and won’t work here.
Let’s Build Some Magic: The Step-by-Step Guide
Okay, team. This is where the fun begins. We’re not mixing, we’re layering. It’s like edible arts and crafts. Get your pan ready, and let’s dive in!
- Preheat & Prep: First things first, get that oven preheating to a toasty 350°F (175°C). Now, grab your 9×13 inch glass baking dish. Pro-Tip: Lining it with parchment paper is a game-changer. Leave a little overhang on two sides, and you’ll have a built-in sling to lift the entire batch of bars out for pristine, crumb-free slicing later. Trust me on this one!
- The Crispy Base: Pour all 6 cups of Rice Krispies cereal right into your prepared dish. Gently shake the dish or use your hands to spread them into one even, lovely layer. We’re building a foundation here, so we want it to be nice and uniform.
- The Buttery Drizzle: Take your melted butter and, using a spoon, drizzle it back and forth over the entire surface of the cereal. Little Chef Hack: Try to get it as even as possible. This buttery bath is what’s going to toast our cereal and give it that incredible flavor, so we don’t want any dry spots!
- Pillowy Marshmallow Clouds: Now for the fun part—sprinkle those 2 cups of mini marshmallows all over the top. Just scatter them with abandon! Don’t press them down. Let them stay light and fluffy so they can do their melty magic in the oven.
- The Chocolate River: Next up, the chocolate chips! Sprinkle them evenly over the marshmallows. I like to get right up close and personal, scattering them from a height so they fall into all the nooks and crannies between the marshmallows.
- Graham Cracker Crunch: Time for our graham cracker crumbs. Take your crushed crackers and scatter them across the top. This creates a beautiful, sandy-textured layer that will get wonderfully crisp in the oven.
- The Golden Glue: Here comes the star of the show—the sweetened condensed milk. Open the can and slowly, slowly pour it in a thin, steady stream over the entire dish. Pro-Tip: Try to make a zig-zag or a spiral pattern to ensure every single square inch gets a touch of that sweet, caramelizing goodness. This is what binds our five layers into one epic bar.
- Bake to Perfection: Carefully slide your masterpiece into the preheated oven. Bake for 25-30 minutes. You’re looking for a beautifully golden brown top, with bubbles happily puffing up around the edges. Your whole house will smell absolutely divine.
- The Hardest Part: The Wait: I know, I know. This is the ultimate test of willpower. But you must let the pan cool completely on a wire rack before you even think about slicing. I’m talking a few hours, or even popping it in the fridge to speed things up. If you cut into it warm, it will be a delicious, but soupy, mess. The cooling time is when the sweetened condensed milk sets up and creates the perfect bar texture.
How to Serve These Gooey Masterpieces
Once your bars are completely cool, use the parchment paper sling to lift the whole block onto a cutting board. A sharp chef’s knife or a bench scraper is your best friend here. For super clean cuts, you can even wipe the blade clean between slices. These bars are rich, so I usually cut them into 12 generous squares, but you can easily get 16 smaller, two-bite pieces for a party. Serve them on a big platter, maybe with a little extra sprinkle of graham cracker crumbs on top for a fancy touch. They’re perfect with a tall glass of cold milk, a hot coffee, or just eaten standing over the kitchen sink in a moment of pure bliss—no judgment here!
Get Creative! Fun Flavor Twists
Once you’ve mastered the classic, the world is your oyster! Here are a few of my favorite ways to mix it up:
- Salty-Sweet Supreme: Sprinkle 1/2 cup of crushed pretzels in with the graham cracker layer. The saltiness is a phenomenal contrast to the sweet.
- Tropical Escape: Swap the chocolate chips for 1 cup of white chocolate chips and add 1/2 cup of shredded coconut with the marshmallows. It’s like a s’more went on vacation!
- Peanut Butter Paradise: Drizzle 1/2 cup of warm peanut butter over the cereal layer *before* adding the marshmallows. You’re welcome.
- “Rocky Road” Rendezvous: Add 1/2 cup of chopped walnuts or pecans with the chocolate chips for a delightful crunch.
- “Everything but the Pantry” Bar: Toss in a handful of butterscotch chips, toffee bits, or even crushed potato chips for the ultimate Franken-dessert.
Olivia’s Kitchen Confidential
This recipe has been through so many iterations in my kitchen! I once tried to make it “healthier” by using a sugar-free cereal and low-fat condensed milk. Let’s just say it was a noble failure. Some recipes are meant to be indulgent, and this is one of them. Embrace the butter and sugar, friends!
Another funny story: I brought these to a neighborhood BBQ once, and a very serious foodie spent ten minutes trying to guess the “secret ingredient” in the crust. He was convinced it was some exotic nut or a special shortbread. The look on his face when I said “Rice Krispies” was priceless. It’s the ultimate humblebrag dessert—it looks and tastes incredibly complex, but the secret is wonderfully simple.
Over time, I’ve learned that the parchment paper sling is non-negotiable for pretty bars, and that letting them cool is the true mark of a patient baker. This recipe is a testament to my grandma’s no-fuss, big-flavor philosophy, and I hope it becomes a beloved staple in your home, too.
Your Questions, Answered!
I’ve made these bars more times than I can count, and I’ve heard all your brilliant questions. Here are the answers to the most common ones!
Q: My bars are way too gooey and fall apart when I cut them. What happened?
A: The number one culprit is not letting them cool completely! I promise, the wait is essential for the structure. The second most common issue is not using enough sweetened condensed milk or not distributing it evenly. Make sure you’re using the full 14-ounce can and pouring it in a slow, steady stream to cover everything. If you’re in a hurry, pop the pan in the fridge for an hour to set.
Q: Can I make these gluten-free?
A> Absolutely! Just ensure your Rice Krispies cereal is a gluten-free brand (many are, but always check the box!), and use certified gluten-free graham crackers. All the other ingredients are naturally gluten-free, so it’s a super easy swap.
Q: My marshmallows on top got really dark/burnt. How can I prevent that?
A> Great question! Ovens can vary, and the sugars in the marshmallows can brown quickly. If you notice the top getting too dark before the 25-minute mark, simply lay a loose piece of aluminum foil over the top of the pan for the remainder of the baking time. This will act as a shield and prevent over-browning.
Q: Can I use a different pan size?
A> You can, but it will change the texture. A 9×13 is ideal. If you use a smaller pan (like an 8×8), the bars will be much thicker and will need a longer baking time. A larger pan will make thinner, more fragile bars that bake faster. Stick with the 9×13 for your first try!

5-Layer Crispy S’mores Bars
Description
Imagine a campfire in your kitchen: crunchy Rice Krispies, pillowy marshmallows, gooey chocolate, graham cracker crunch, and sweetened condensed milk holding it all together. These 5-layer bars are quick to make, irresistibly gooey, and perfect for parties, bake sales, or just indulging at home. Minimal fuss, maximum magic.
Ingredients
Bars:
-
6 cups Rice Krispies cereal
-
½ cup melted butter or margarine
-
2 cups mini marshmallows
-
1 cup semi-sweet chocolate chips
-
½ package graham crackers, crushed
-
1 can (14 oz) sweetened condensed milk
Instructions
-
Preheat & Prep: Preheat oven to 350°F (175°C). Line a 9×13-inch baking dish with parchment paper, leaving an overhang on two sides.
-
Crispy Base: Spread Rice Krispies evenly in the dish.
-
Buttery Drizzle: Drizzle melted butter evenly over the cereal.
-
Marshmallow Layer: Sprinkle mini marshmallows on top—do not press down.
-
Chocolate Layer: Evenly scatter chocolate chips over the marshmallows.
-
Graham Cracker Layer: Sprinkle crushed graham crackers on top.
-
Sweetened Condensed Milk: Pour in a thin, even stream of sweetened condensed milk over the top.
-
Bake: Bake 25–30 minutes until the top is golden and bubbly. Cover with foil if marshmallows brown too quickly.
-
Cool Completely: Let the bars cool completely in the pan (or refrigerate for faster setting) before slicing. Use the parchment sling to lift out and cut into 12–16 squares.
Notes
-
Salty-Sweet: Add ½ cup crushed pretzels with the graham crackers.
-
Tropical: Swap chocolate chips for white chocolate and add ½ cup shredded coconut.
-
Peanut Butter: Drizzle ½ cup peanut butter over the cereal layer before marshmallows.
-
Nutty Crunch: Add ½ cup chopped walnuts or pecans with chocolate chips.
-
Gluten-Free: Use gluten-free Rice Krispies and graham cracker
Nutrition
- Calories: 350cal Per Serving
- Fat: 15g
- Carbohydrates: 50g
- Fiber: 2 g
- Protein: 4g
Nutritional Information*
*Please note: These are estimates generated by an online calculator and will vary based on your specific ingredients and portion sizes.
Prep Time: 10 minutes | Cook Time: 30 minutes | Total Time: 40 minutes + cooling | Servings: 12 bars
Per Bar: Calories: 320 | Fat: 15g | Carbohydrates: 44g | Sugar: 28g | Protein: 4g | Fiber: 1g | Sodium: 160mg
Final Thoughts: More Than Just a Dessert
So there you have it—the dessert that bridges the gap between a campfire’s crackle and a bakery’s warmth. These 5-Layer Crispy S’mores Bars are more than just a list of ingredients; they’re a vessel for memory, a testament to kitchen creativity, and a guaranteed smile-maker.
Whether you’re making them to cure a rainy-day disappointment, to impress your friends, or simply to treat yourself, I hope this recipe brings as much joy to your kitchen as it has to mine. It’s a little piece of my family’s story, and I’m so thrilled to share it with you. Now, go forth and bake up some magic of your own. Don’t forget the milk!


